More Monoprinting ....

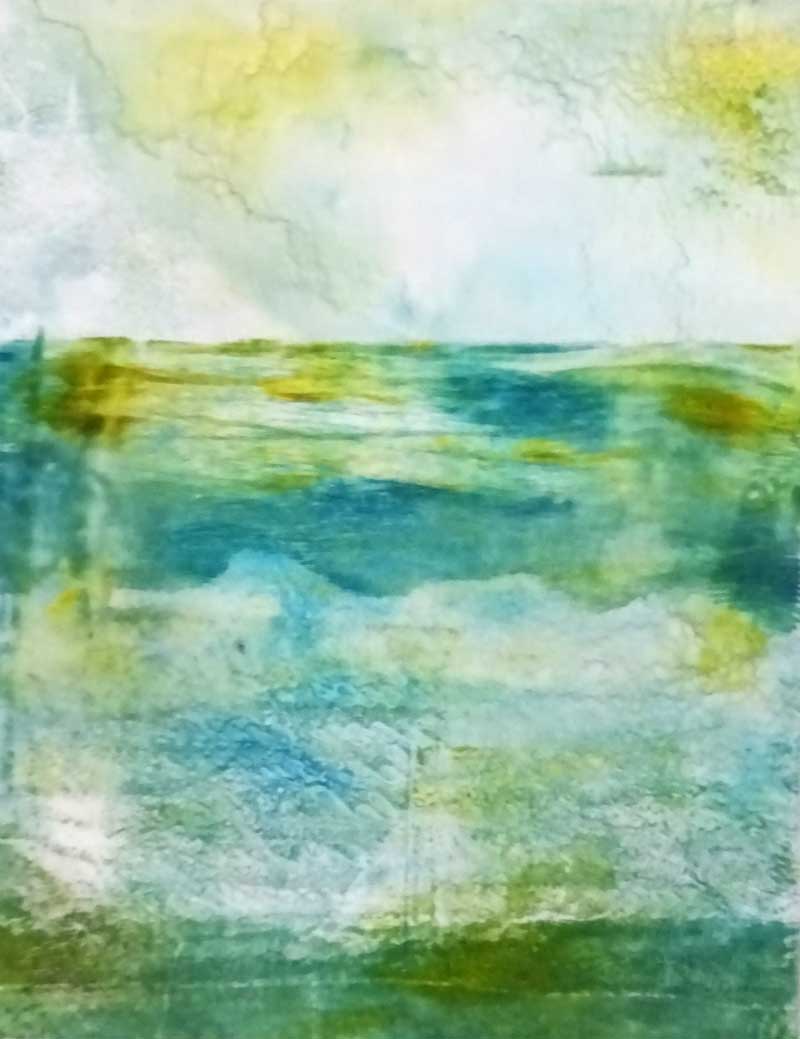
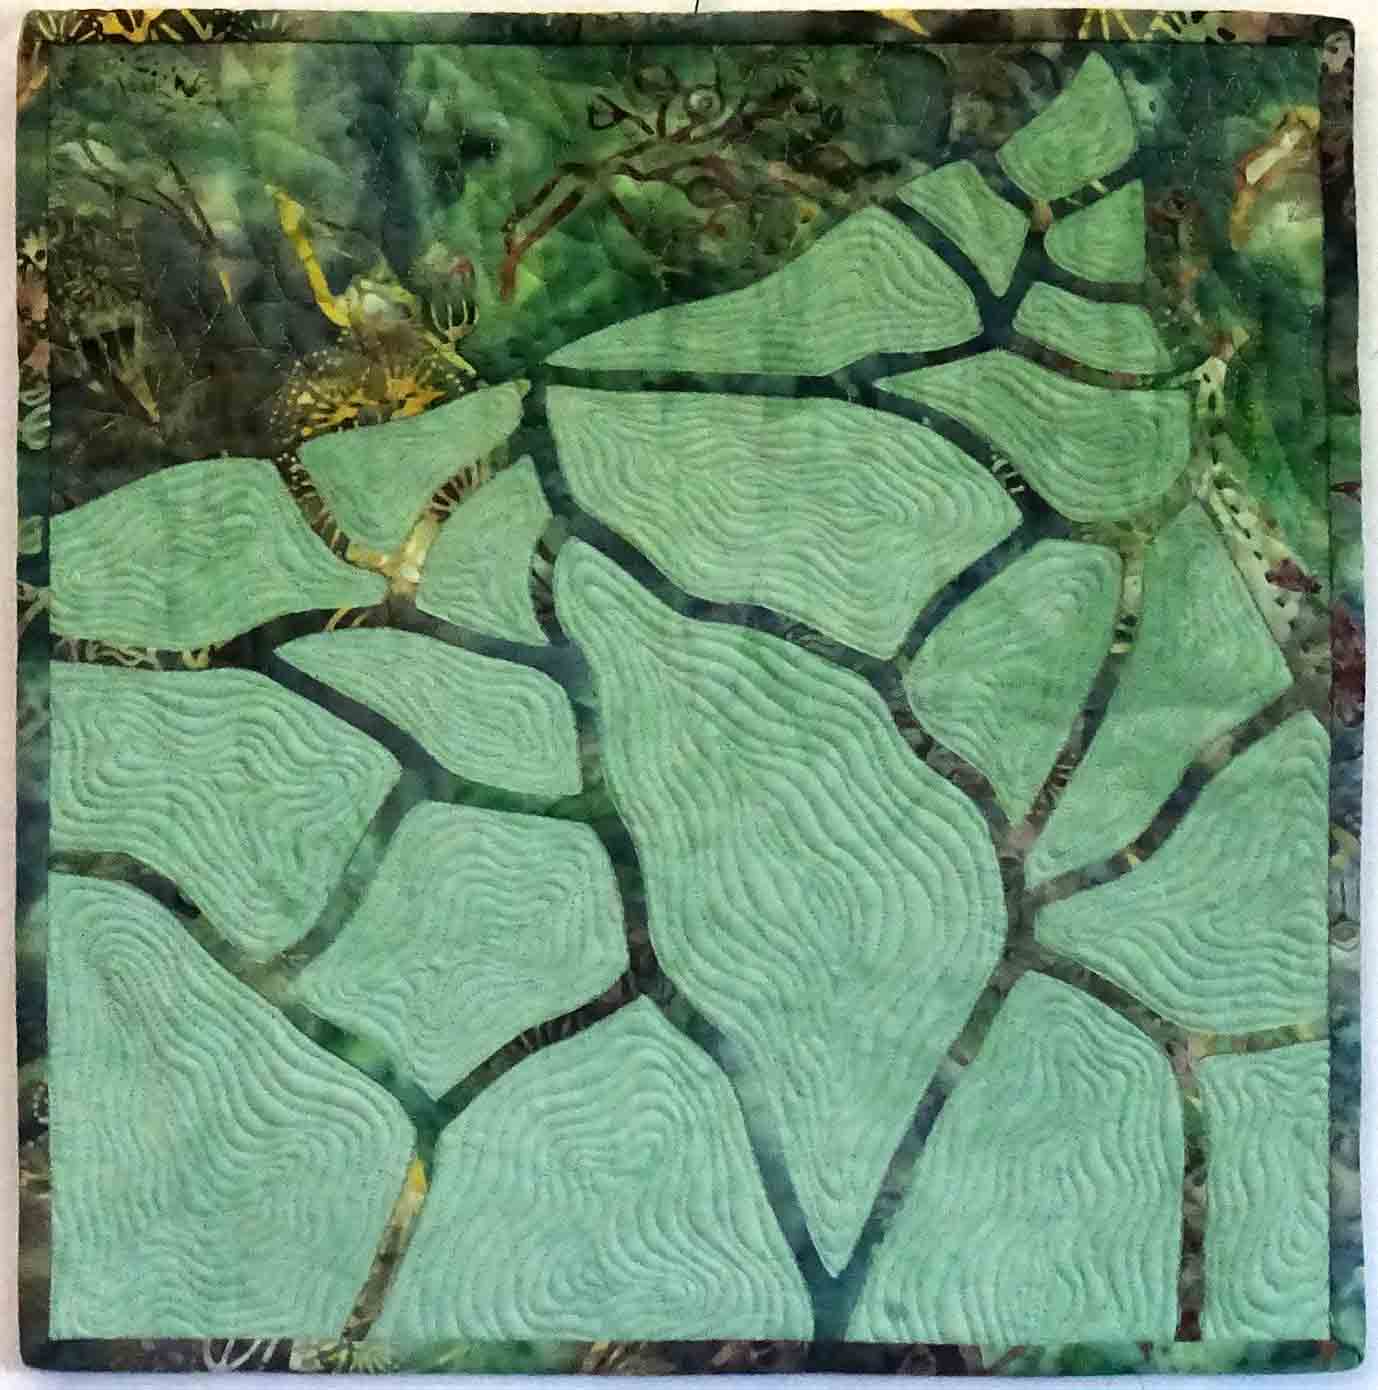
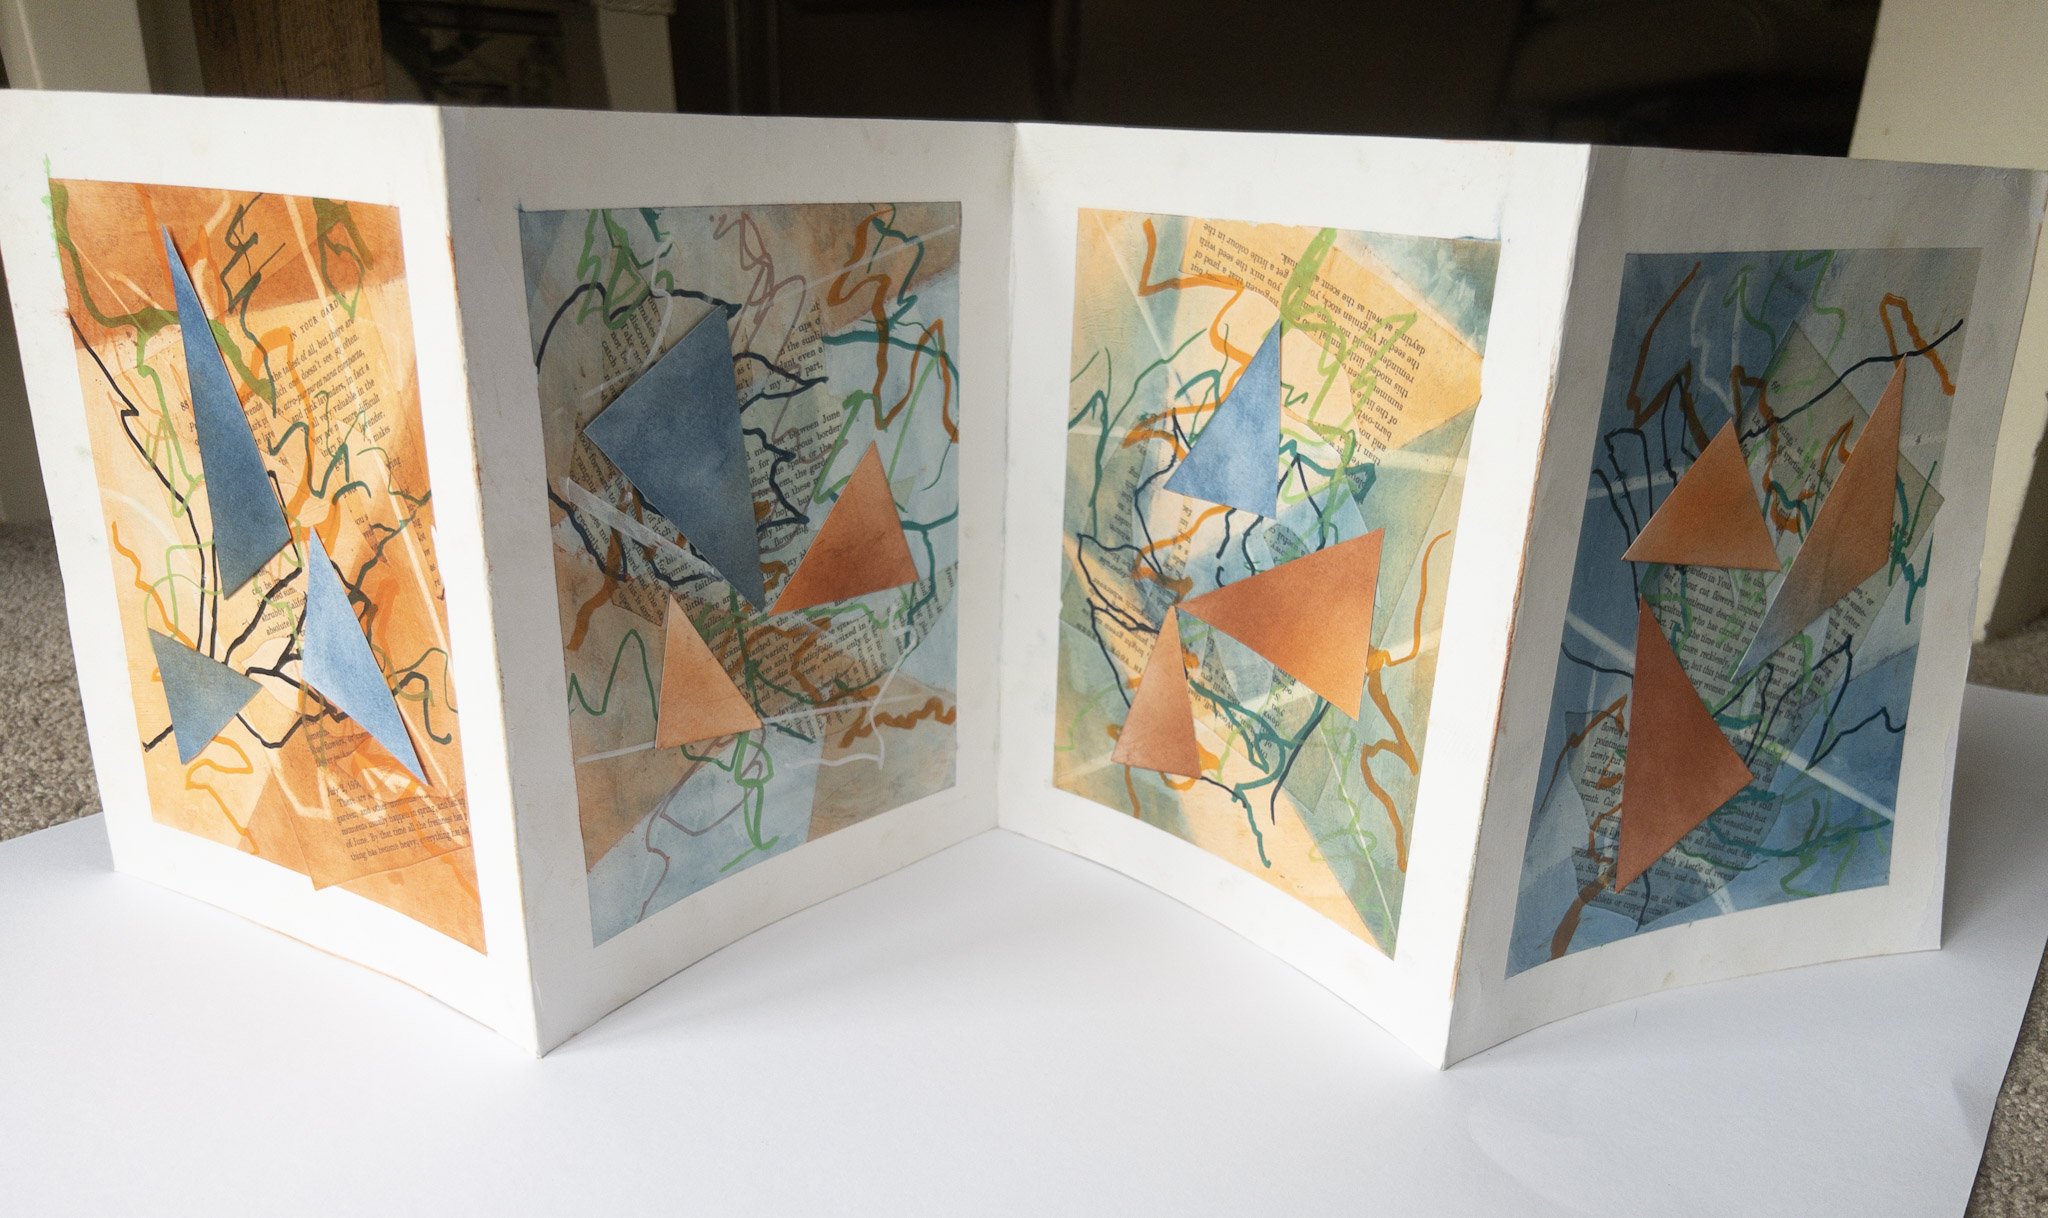
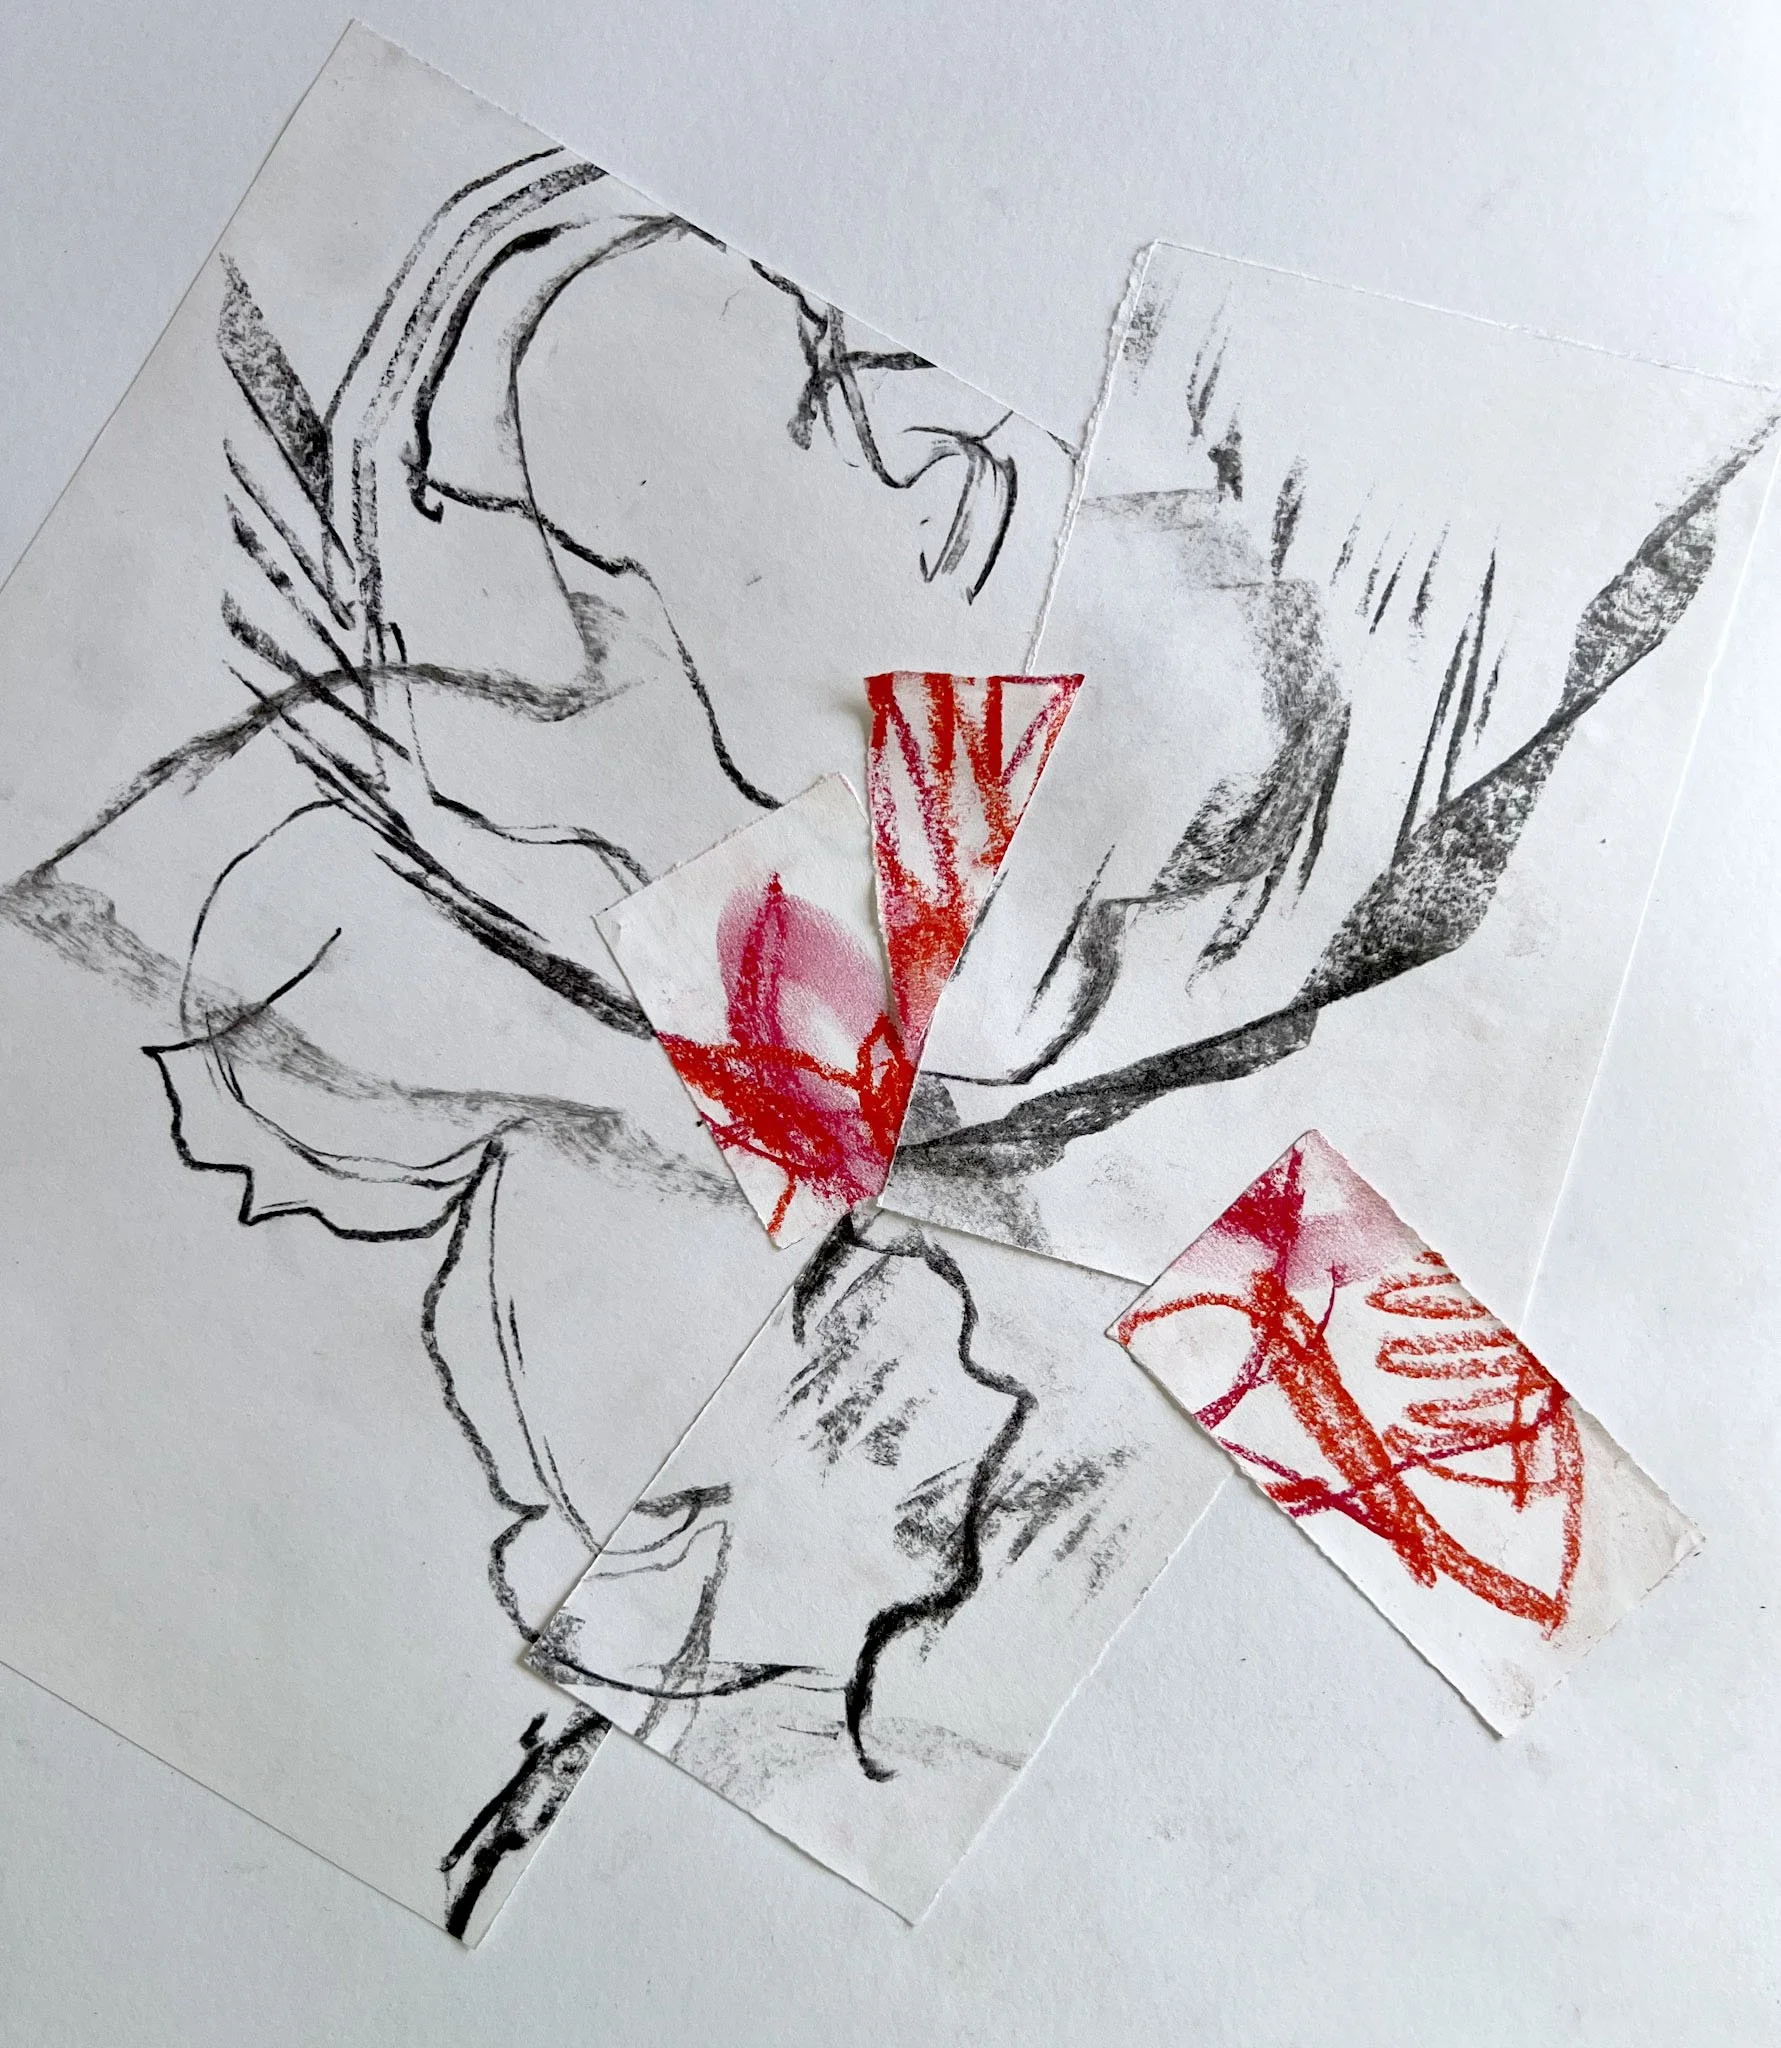
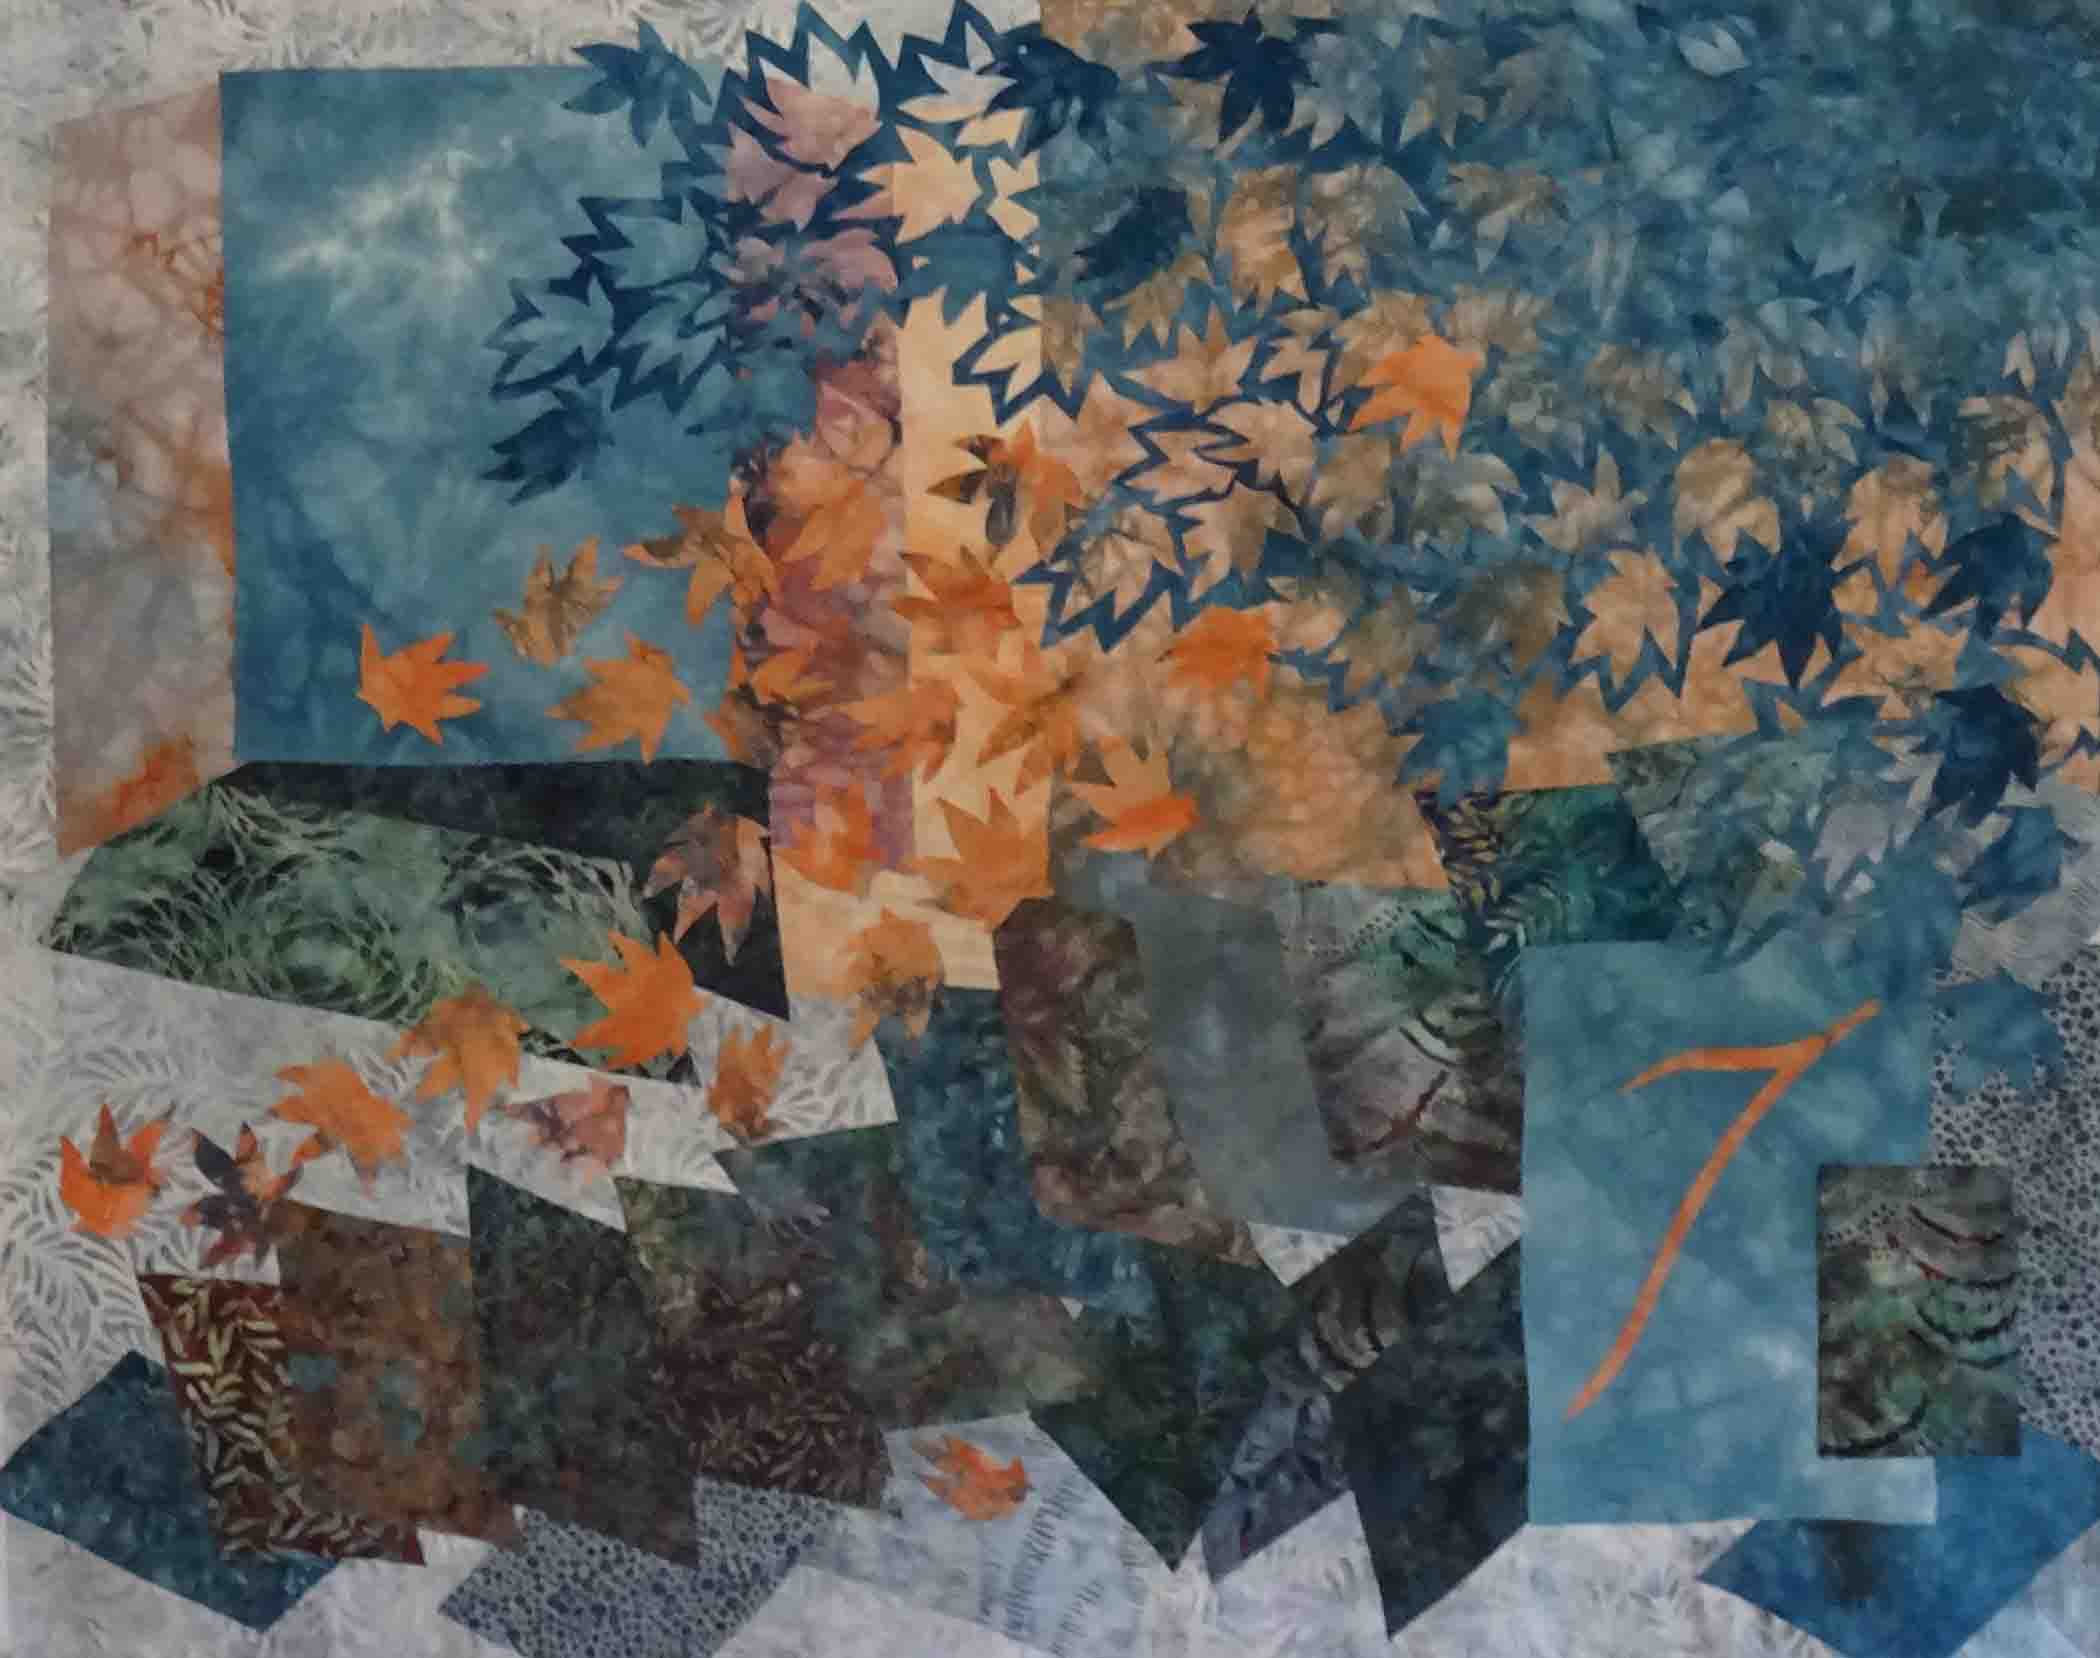
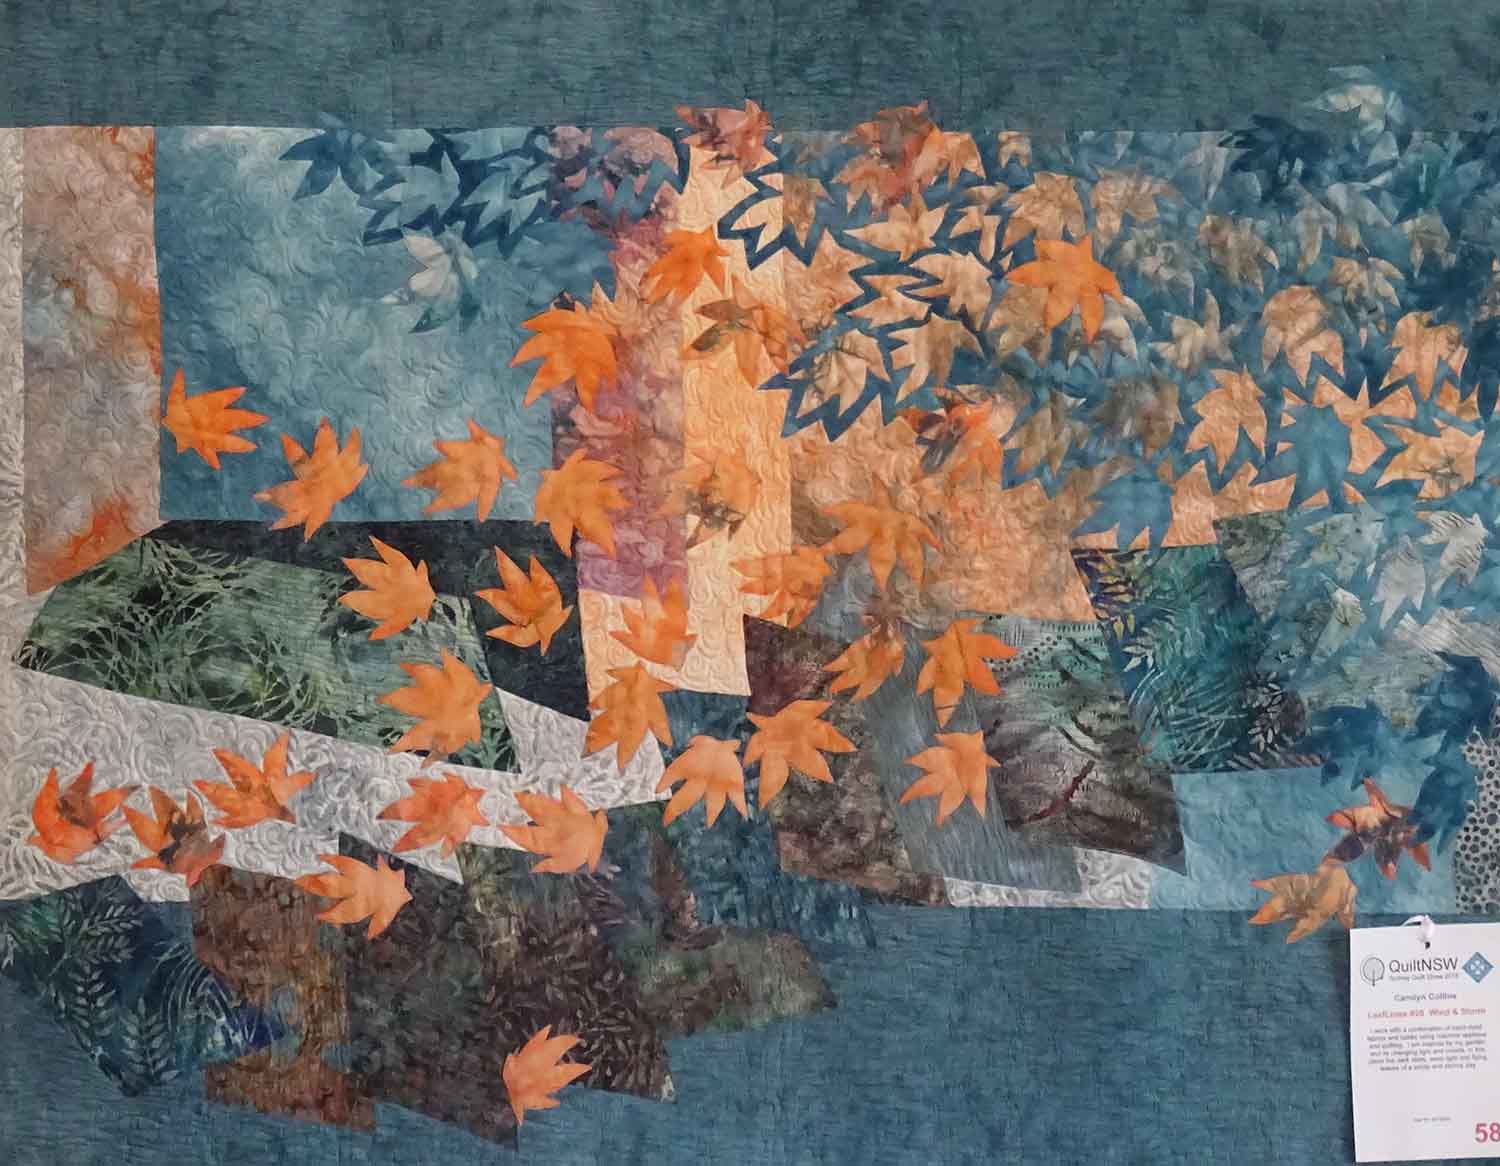
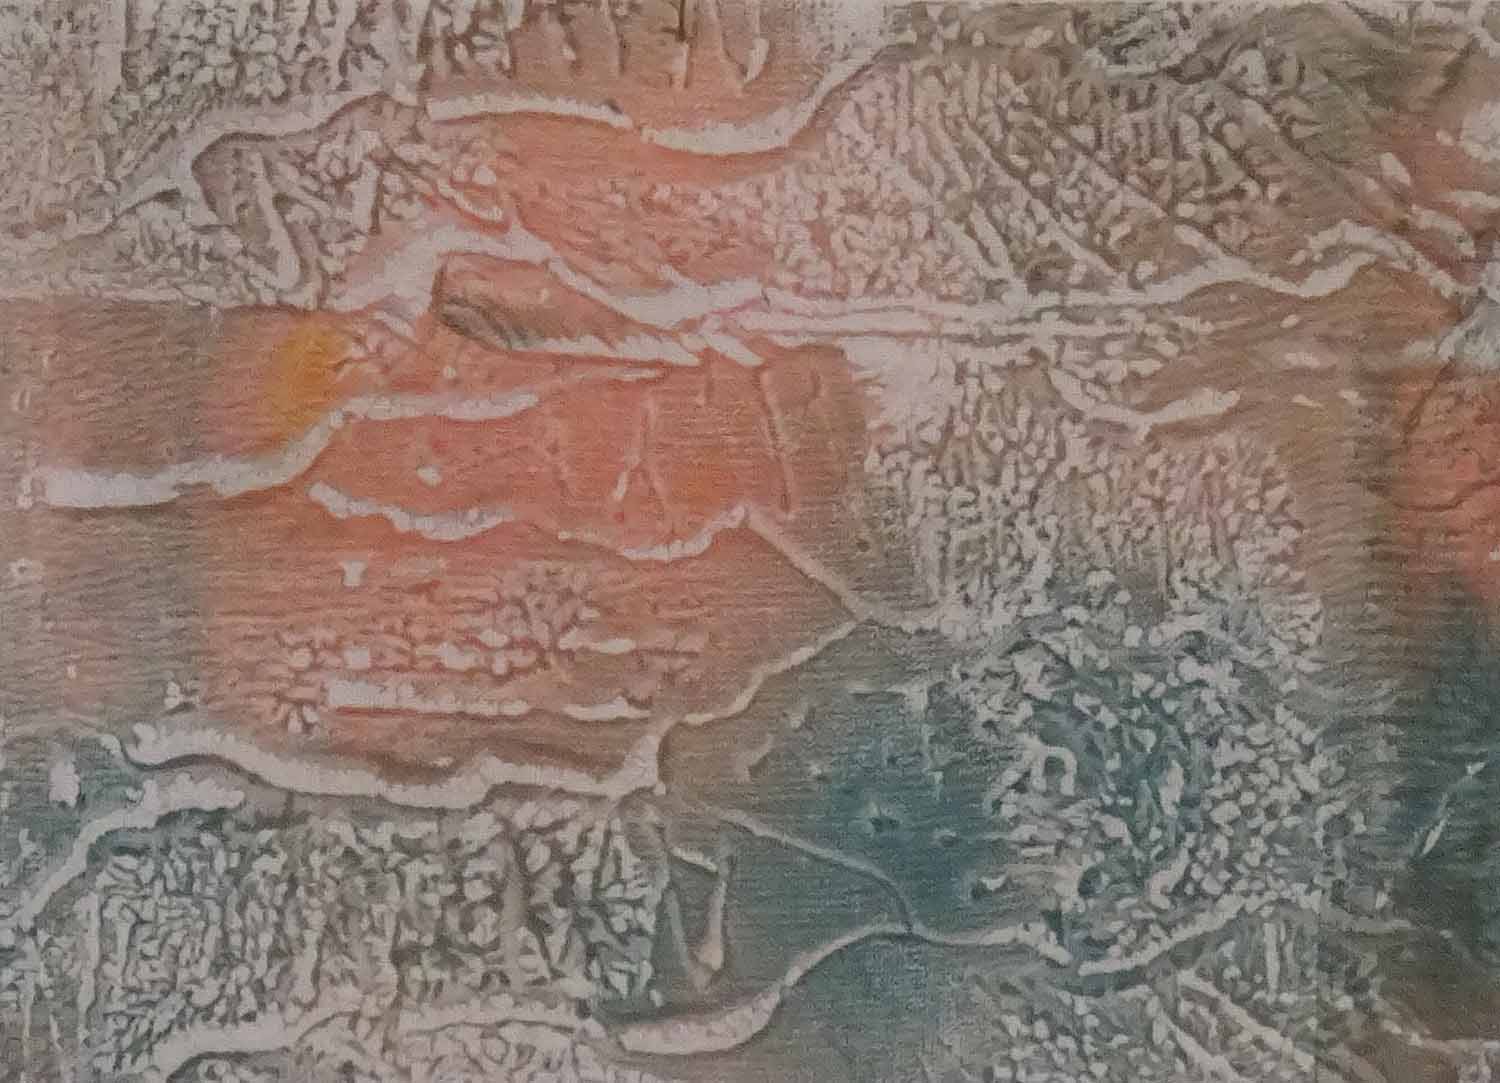
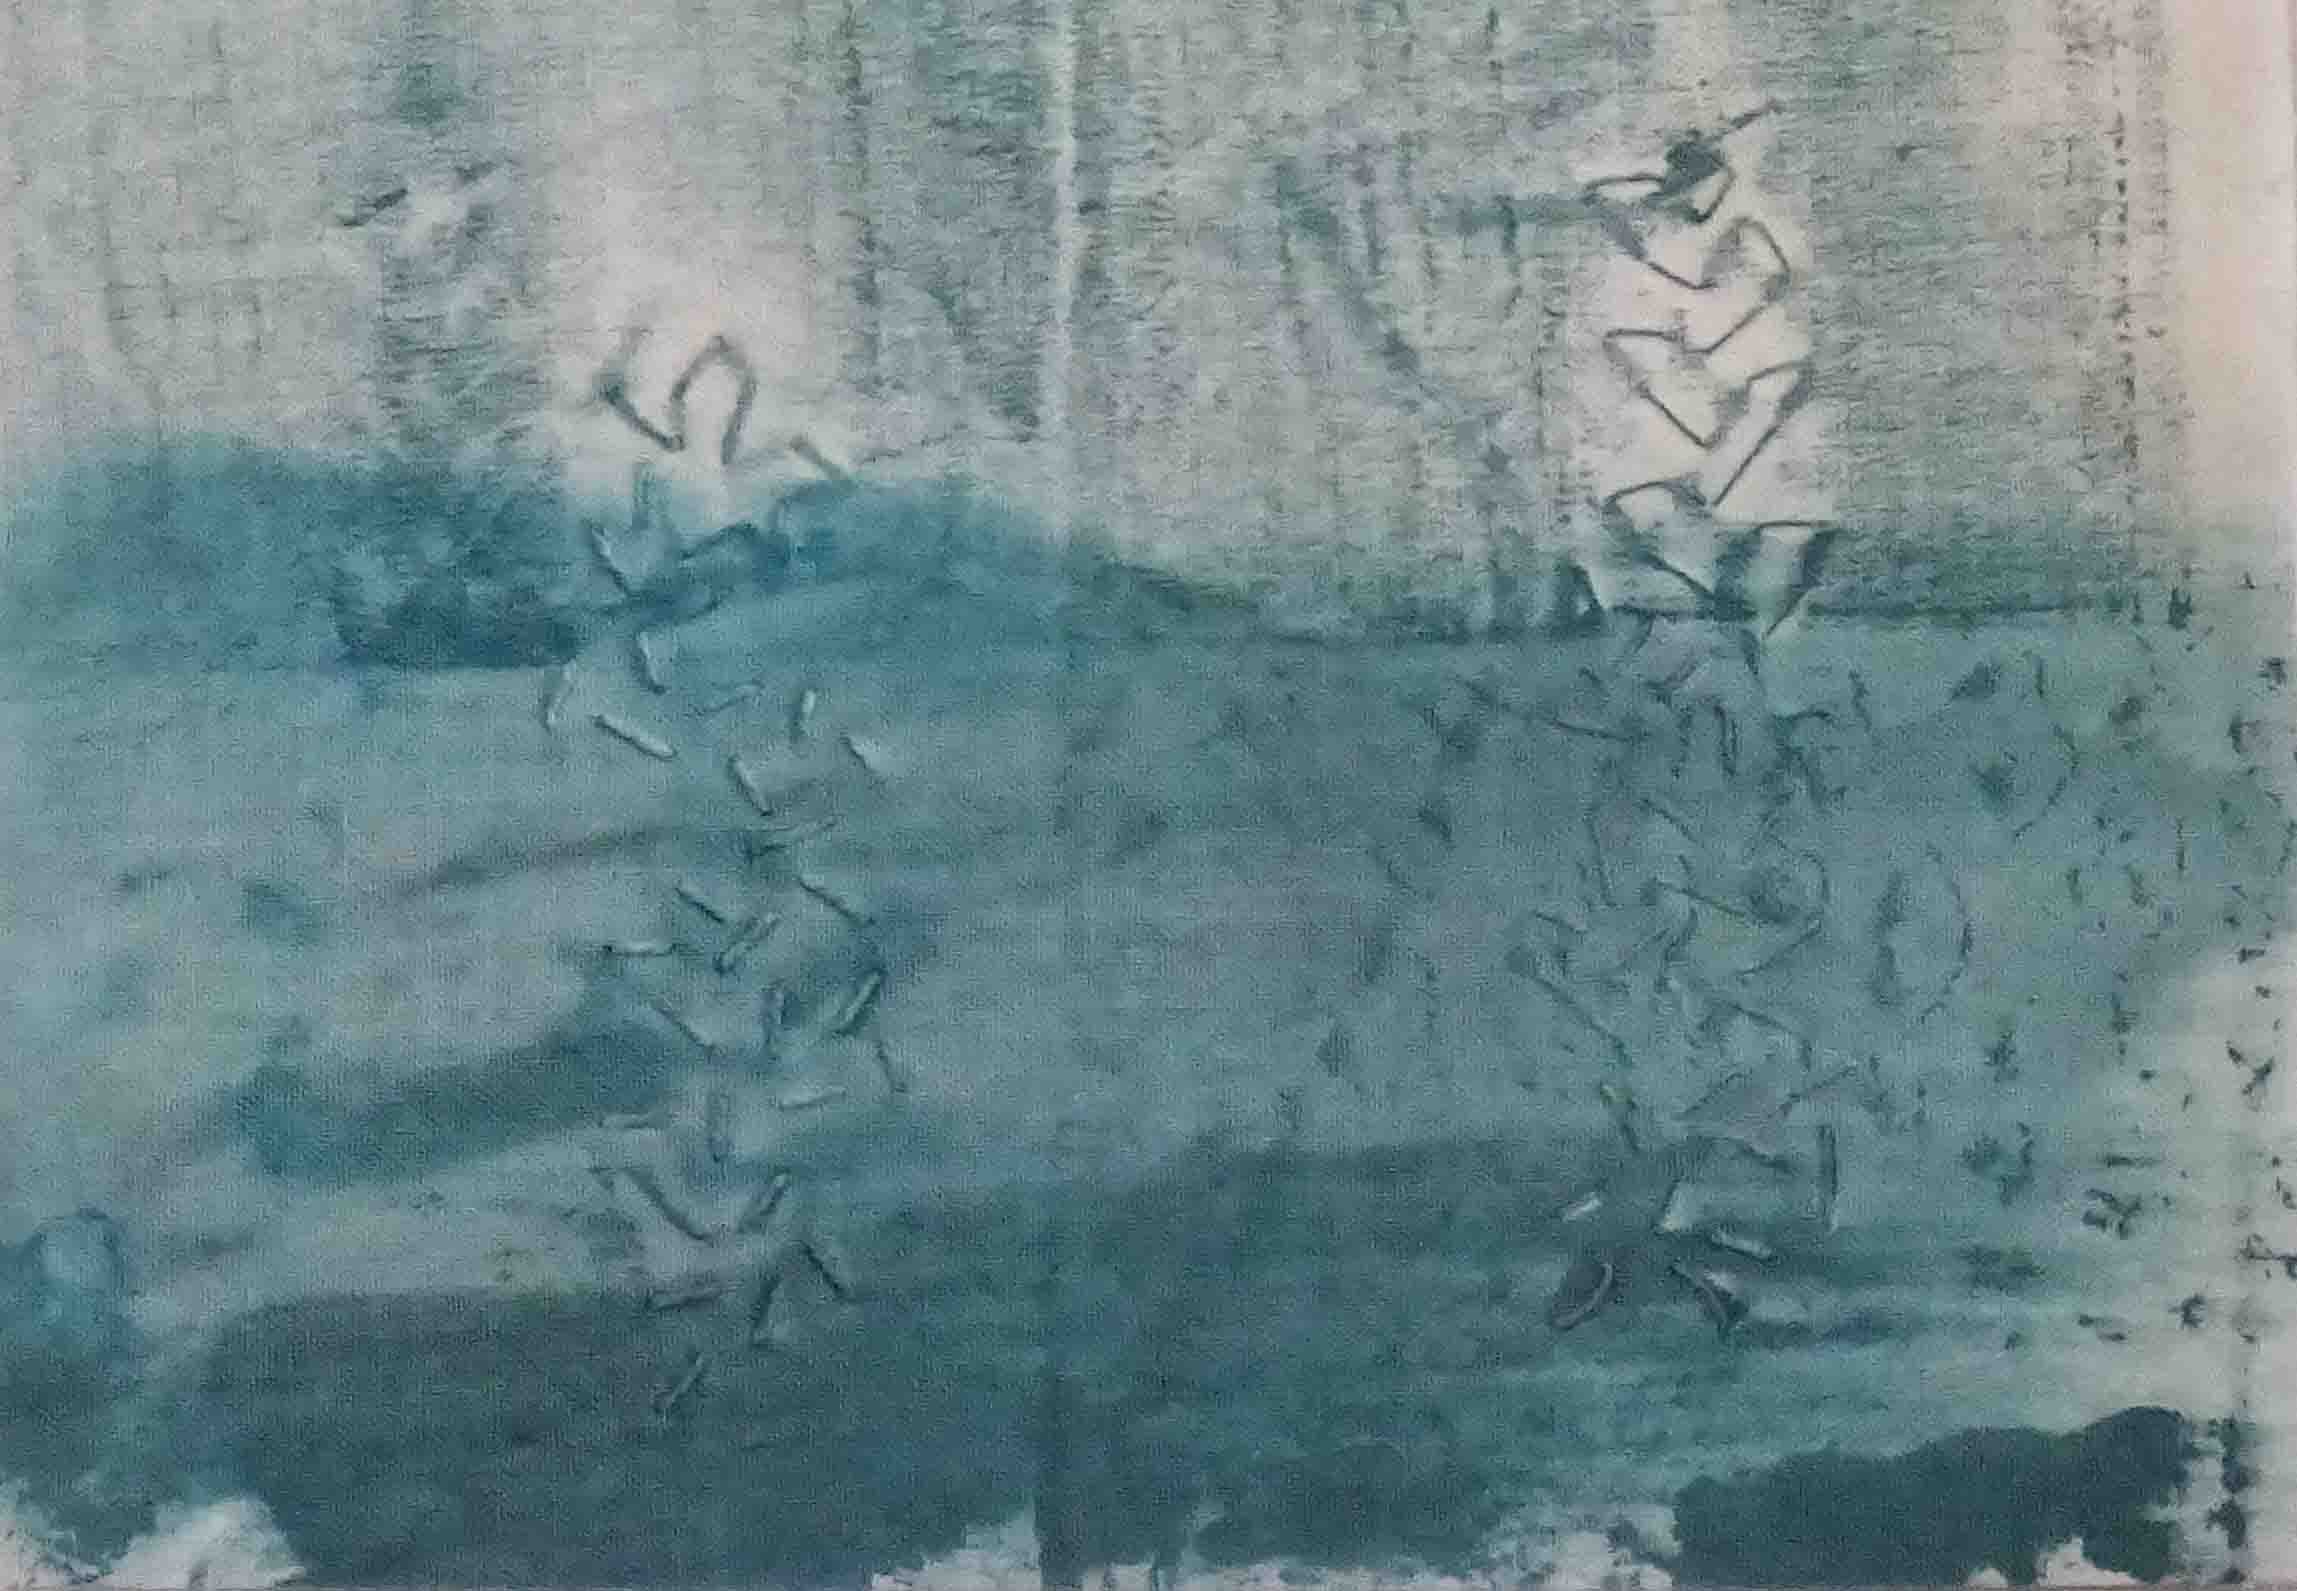
I've had inspiration about some monoprints I made recently ....  

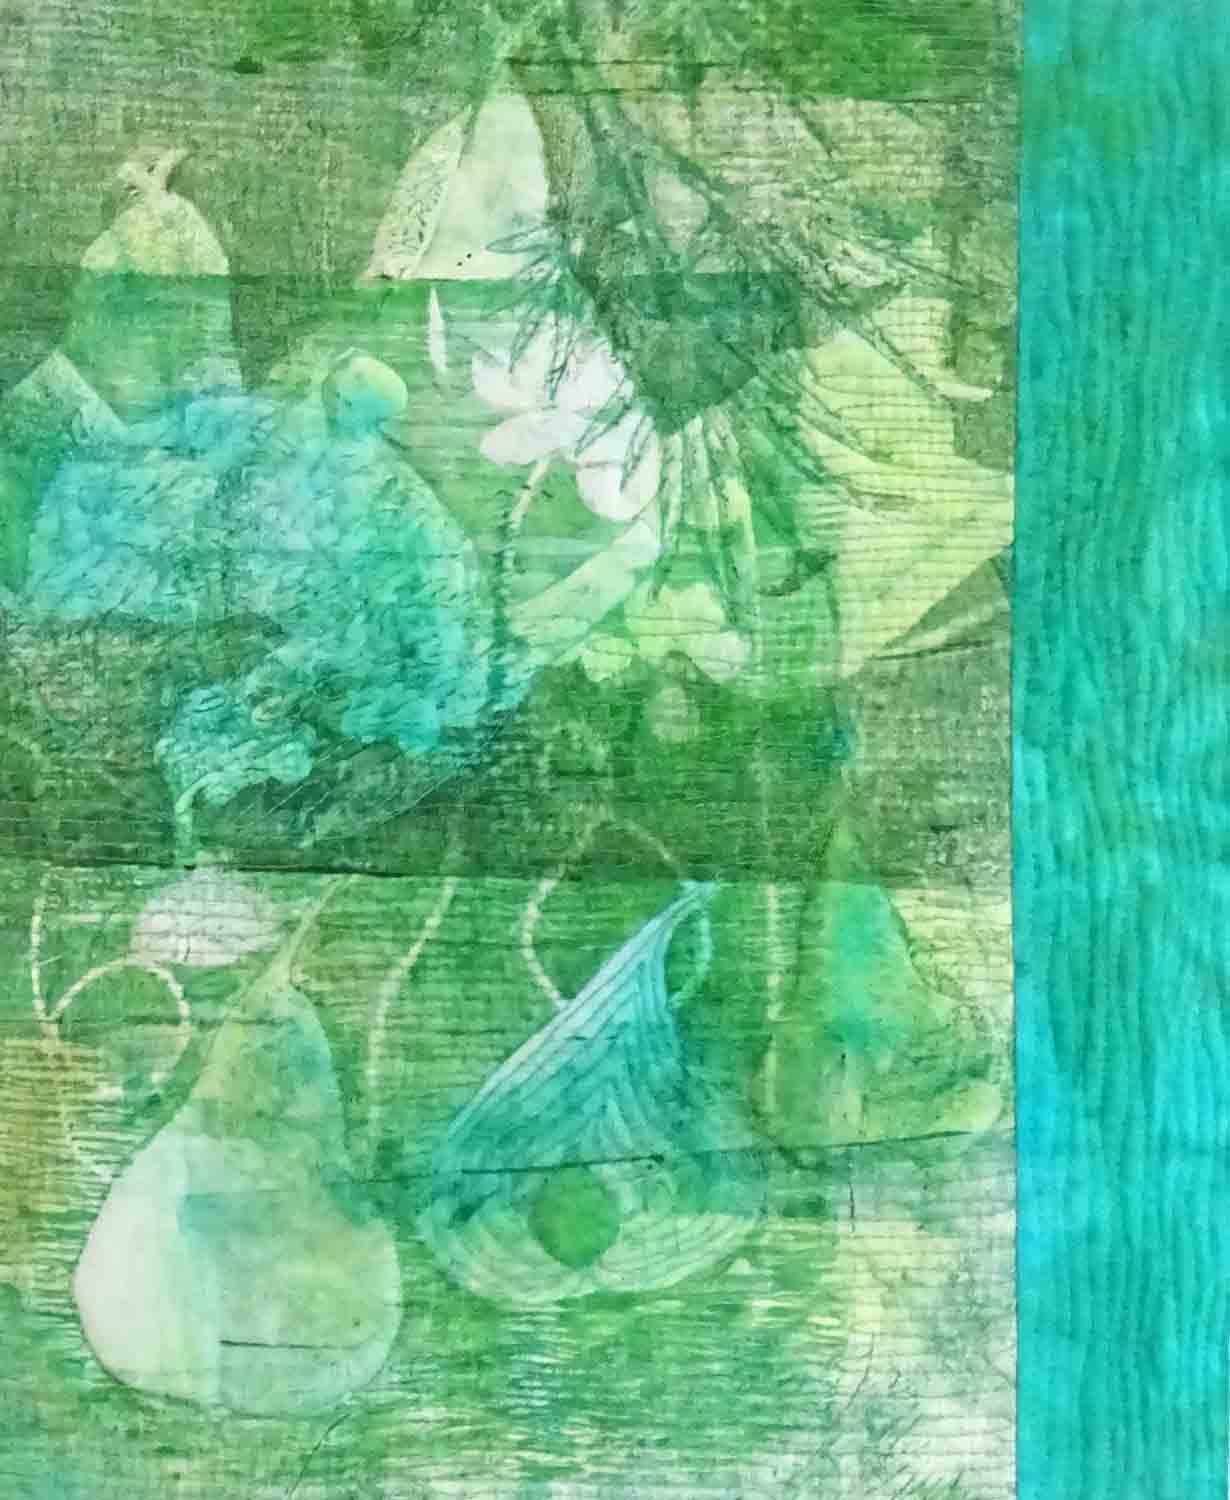
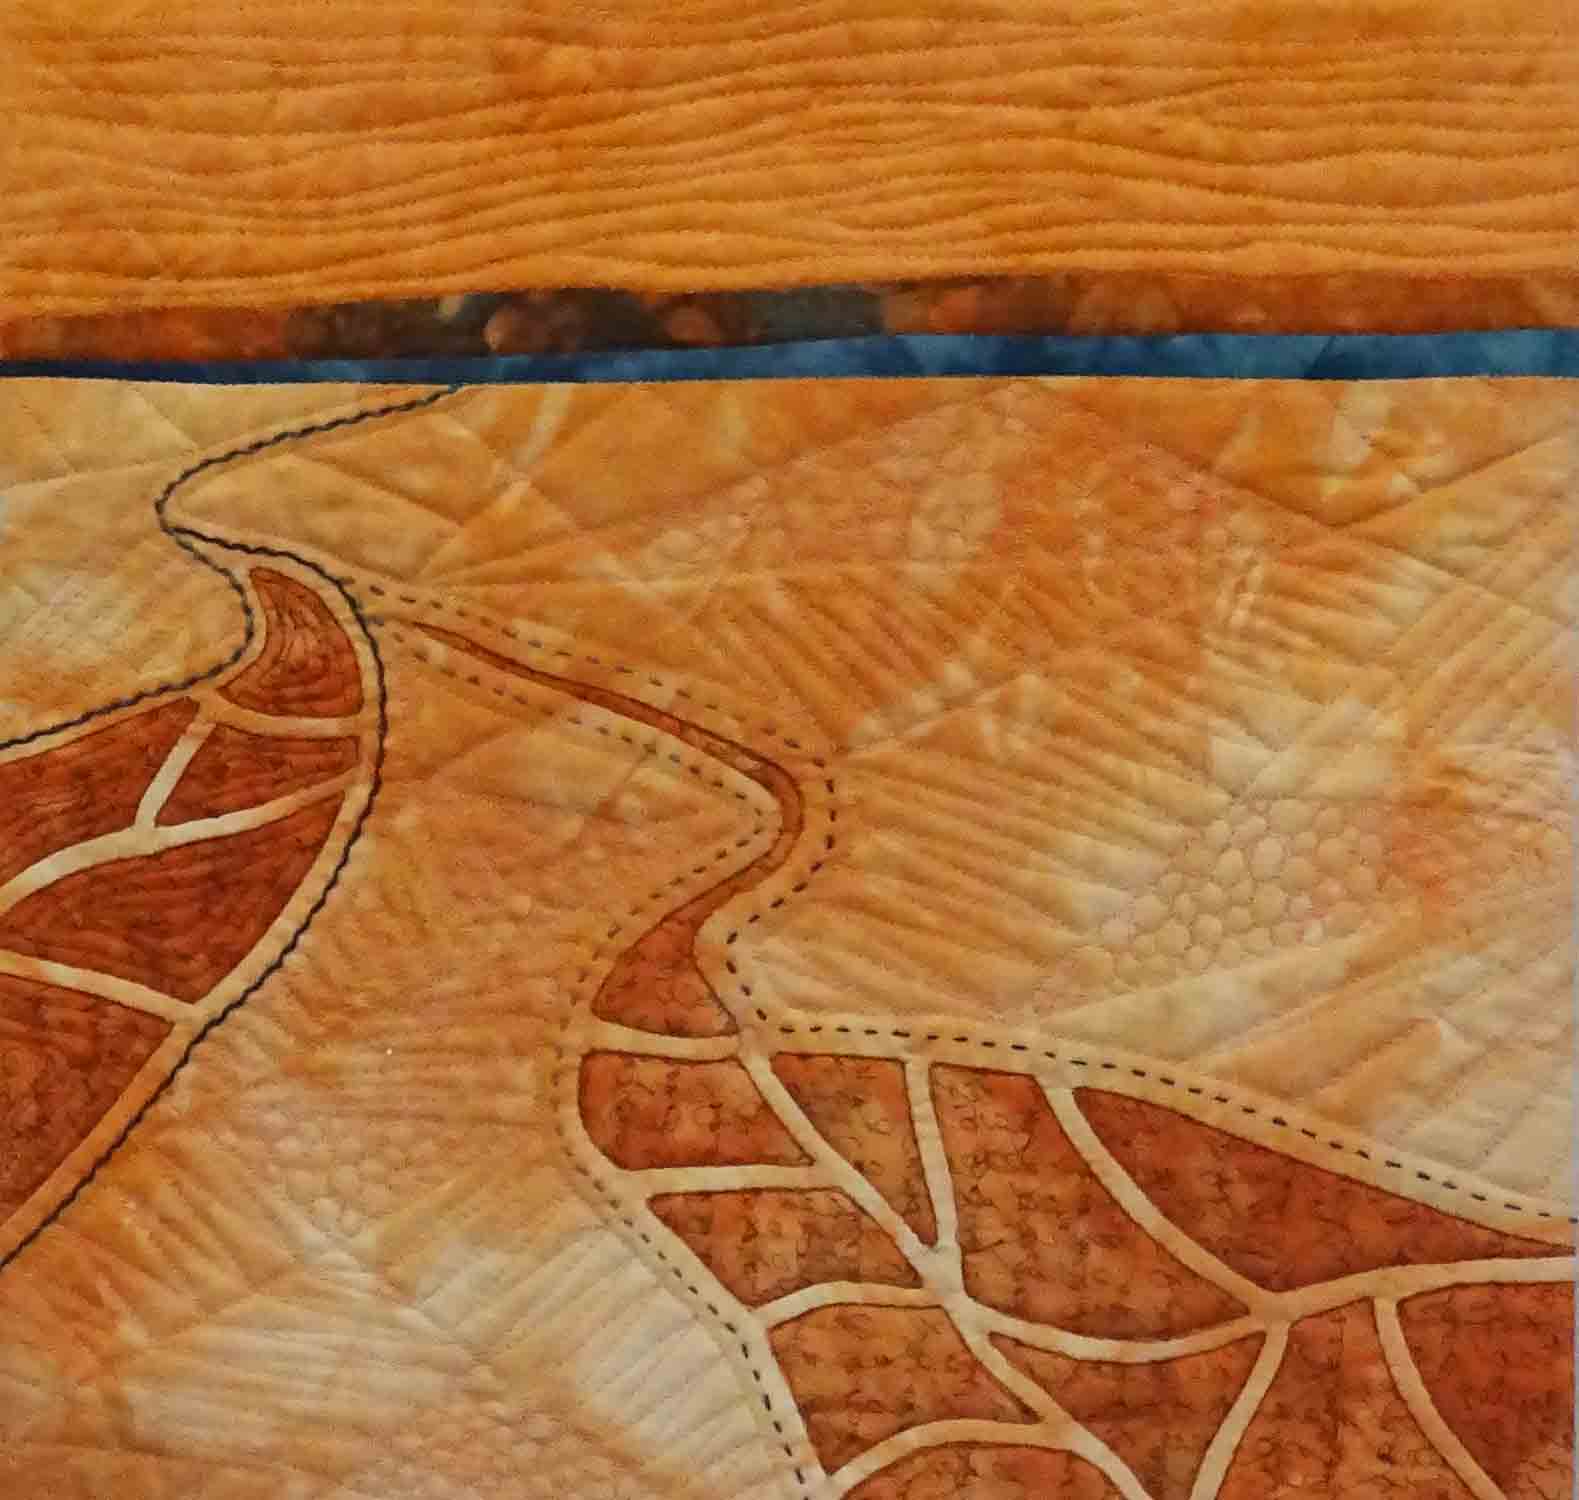
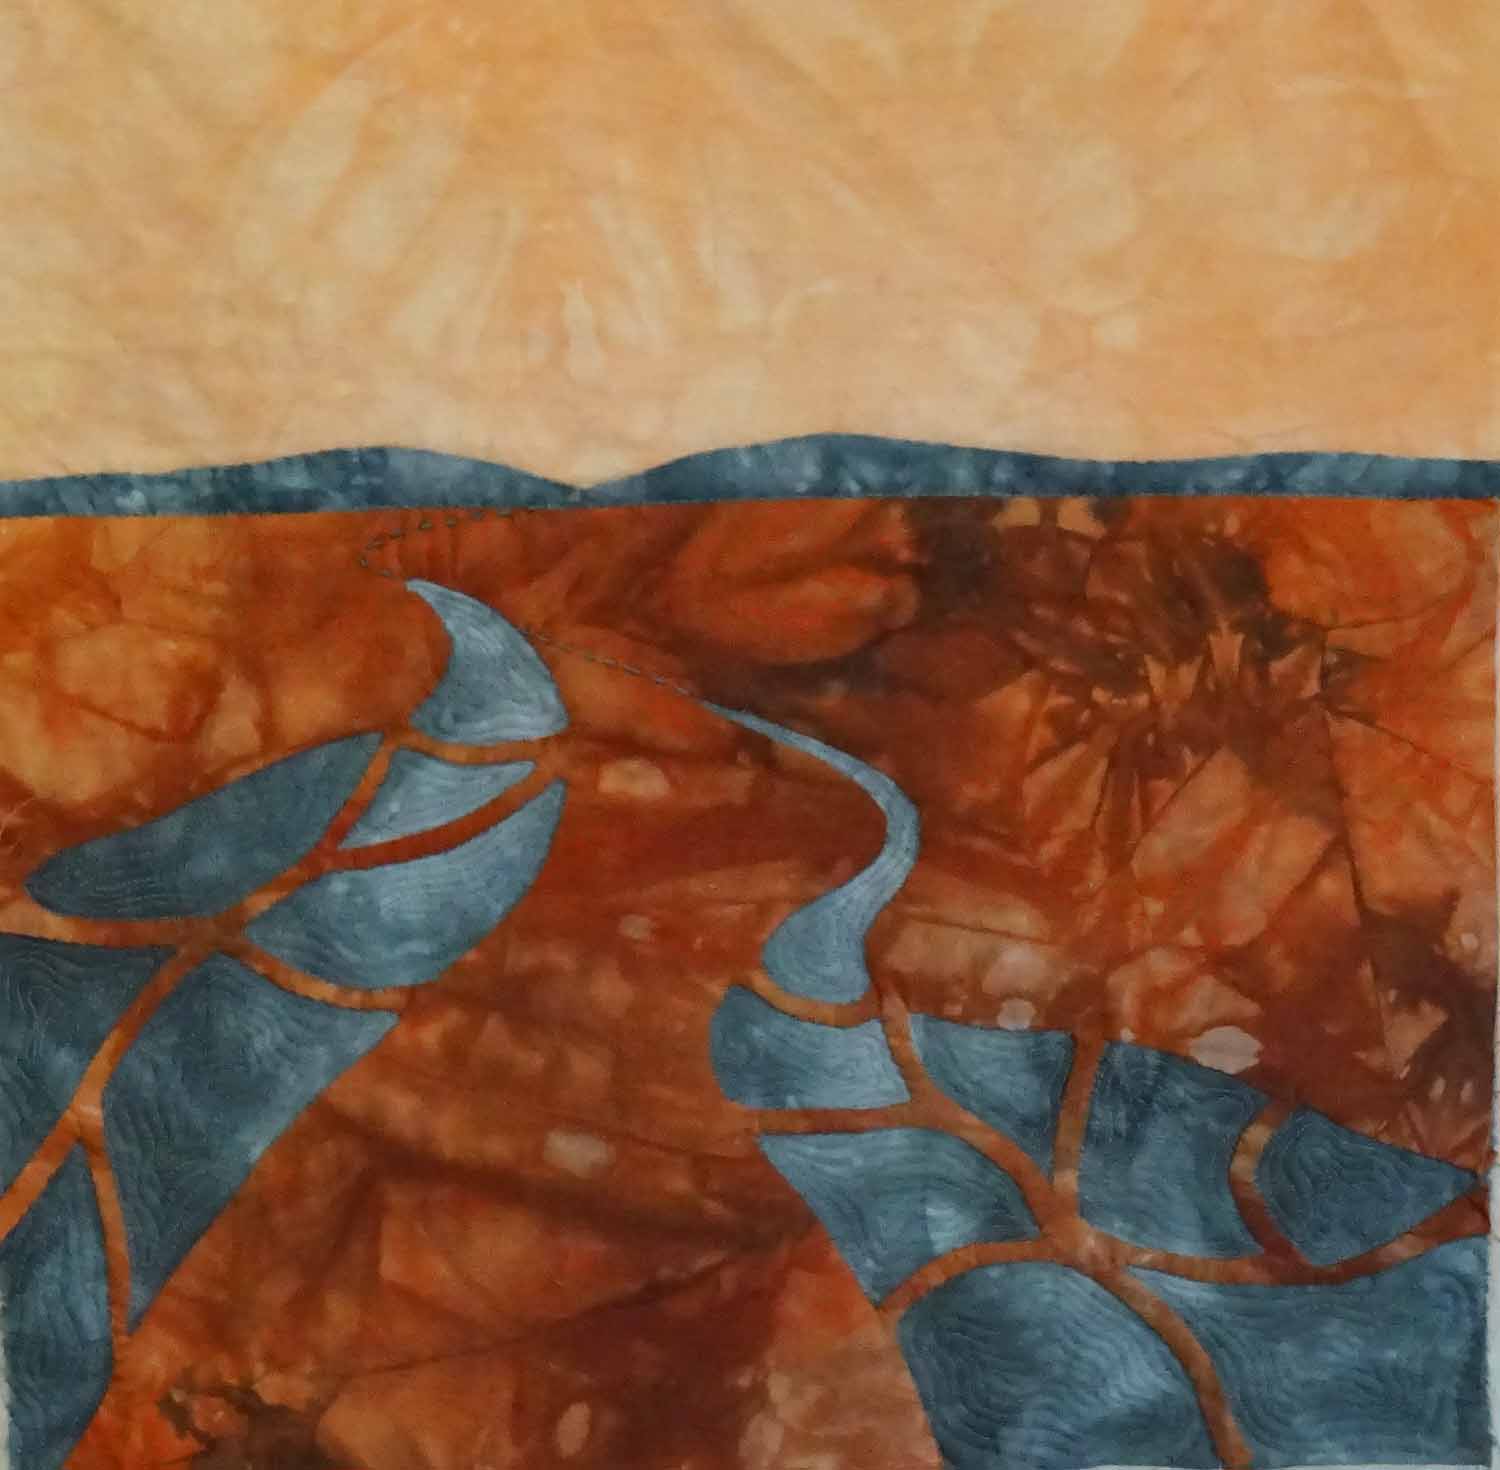
After the first series of monoprints which I framed as individual prints,  I tried printing a larger piece of fabric with the idea that I would cut it up and work with the smaller pieces.

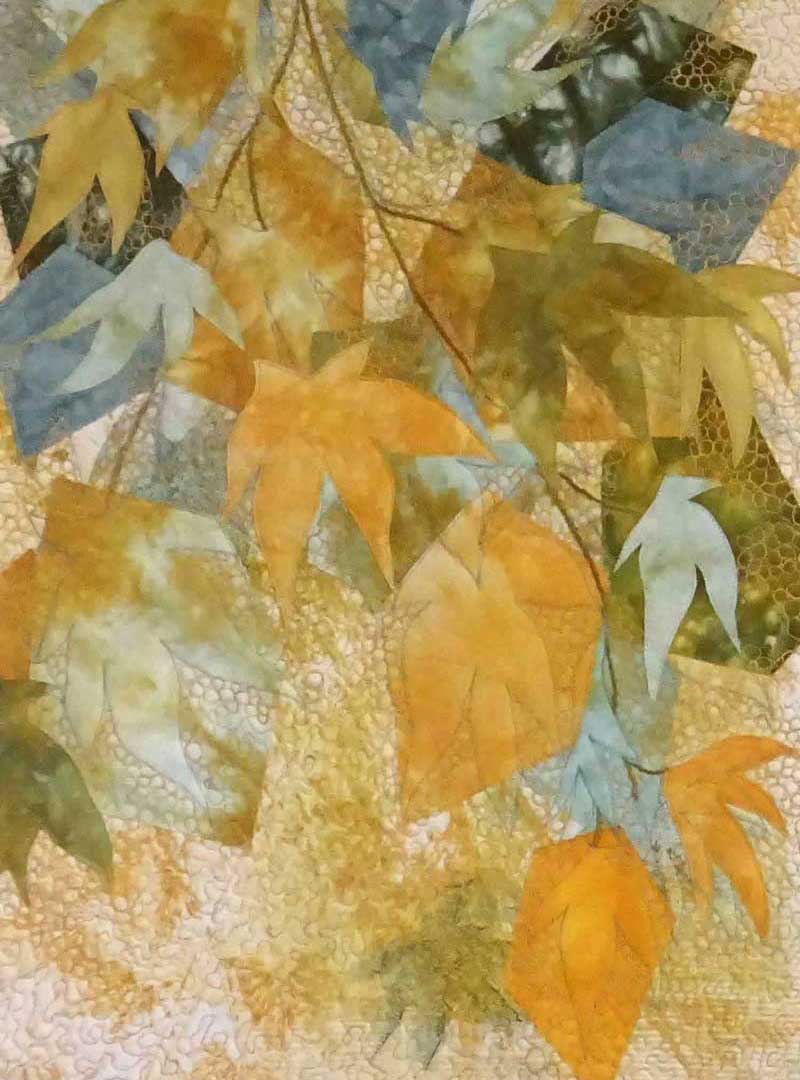
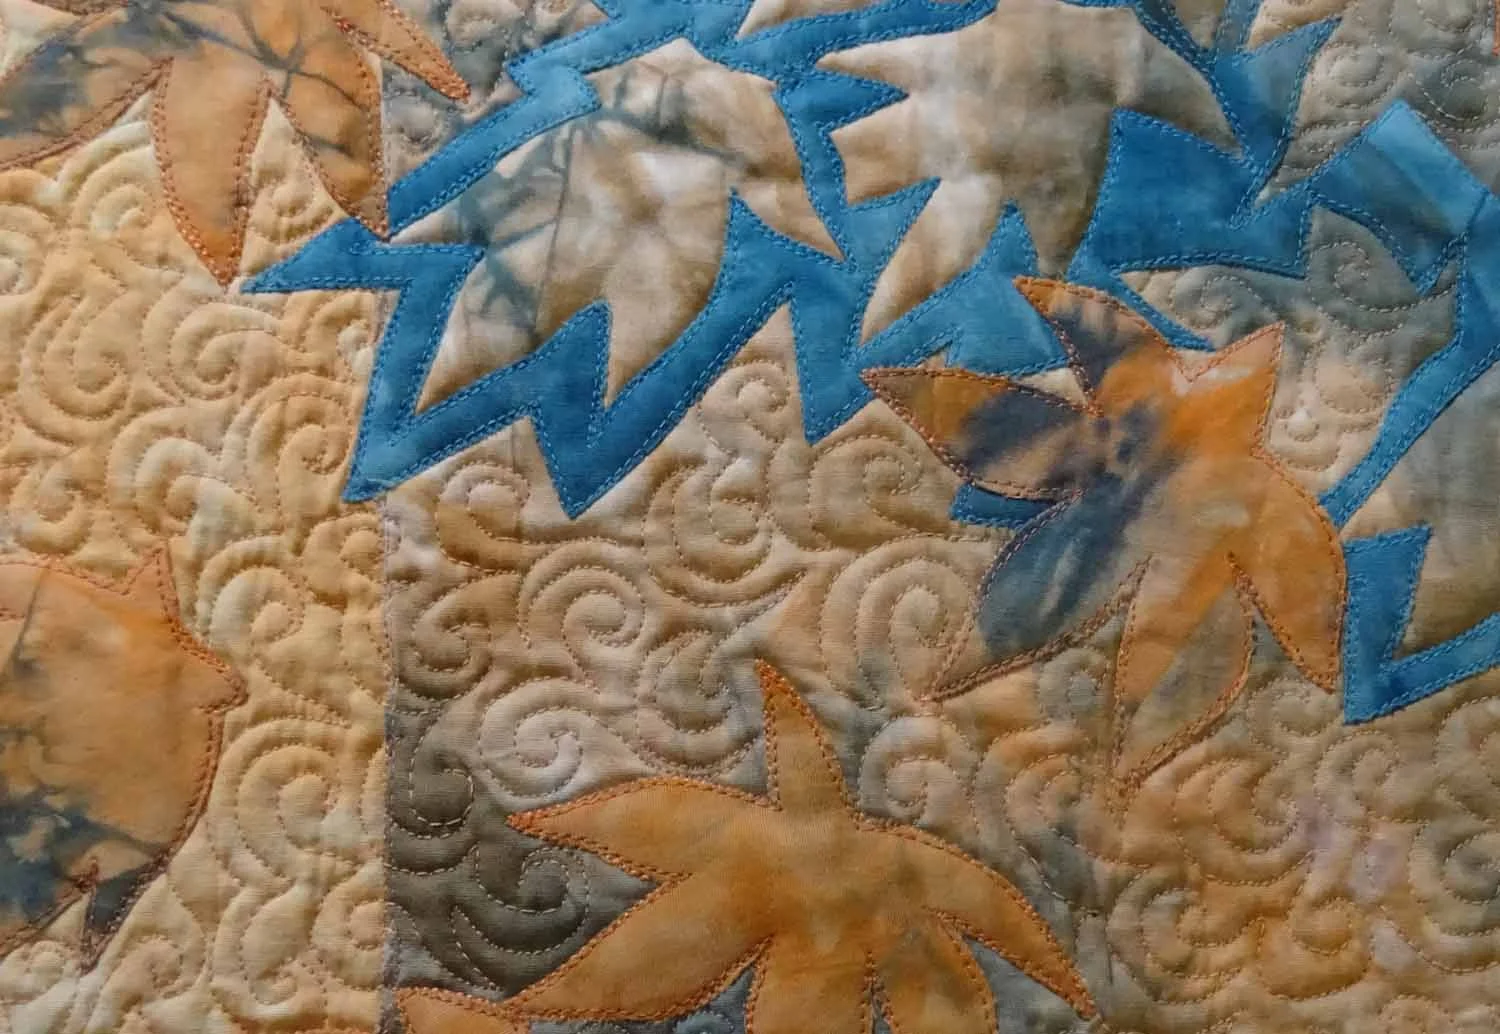
Nice idea but I still wasn't sure where I was going with these monoprints  .... till I was sorting out some of my hand dyed fabric and found some pieces that seemed just right  .... and here is the result .....

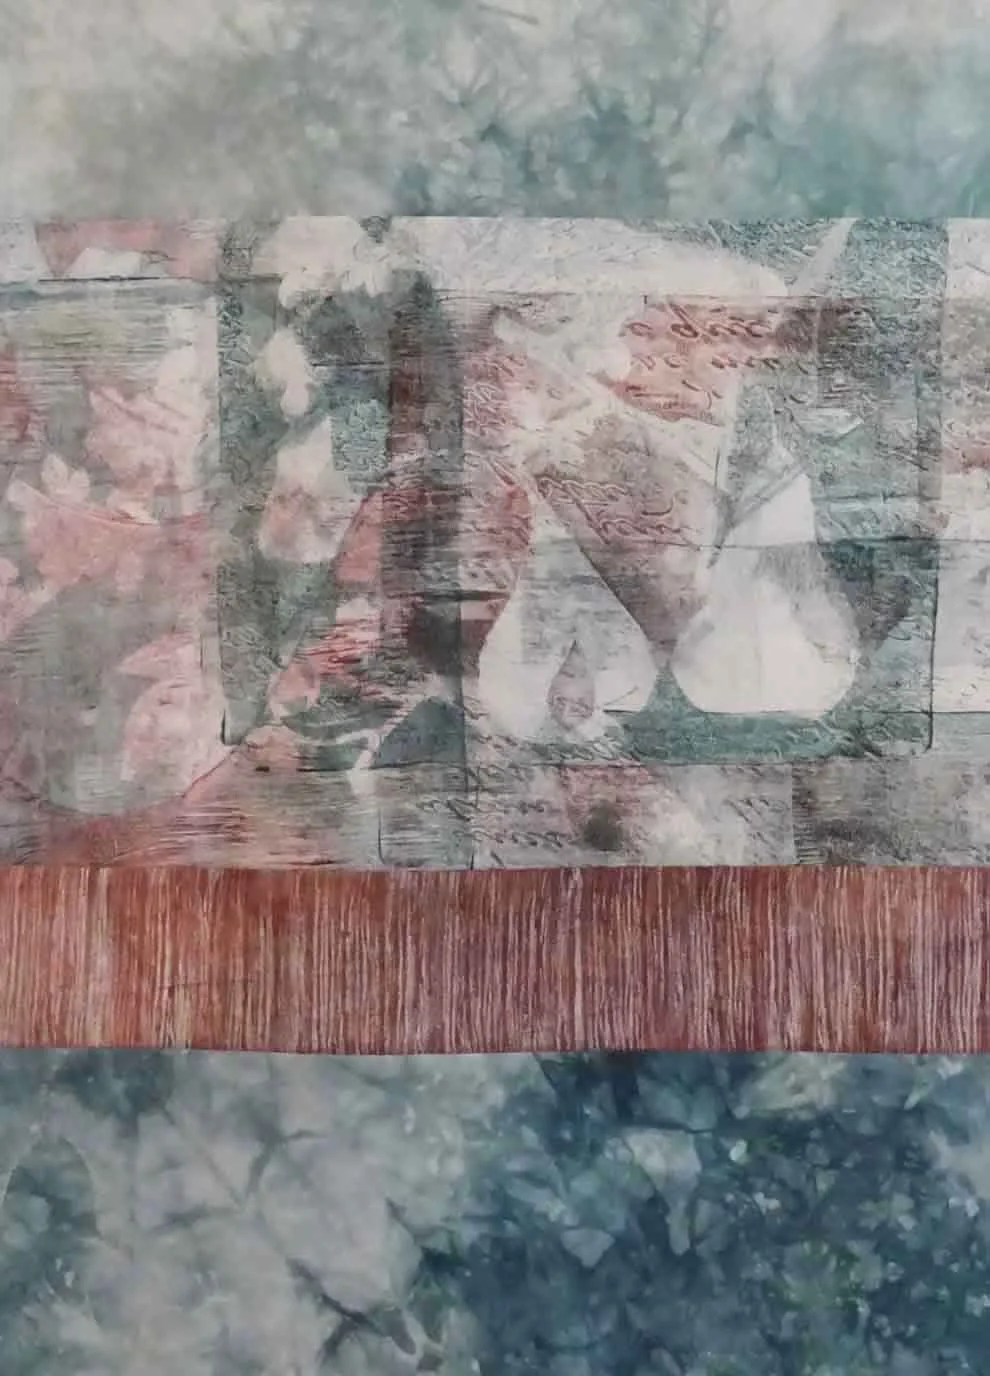
The red brown strip was initially a bit stark so I added some paintstik rubbings to soften the effect ....  I'm very pleased with the result so now for the quilting !!!

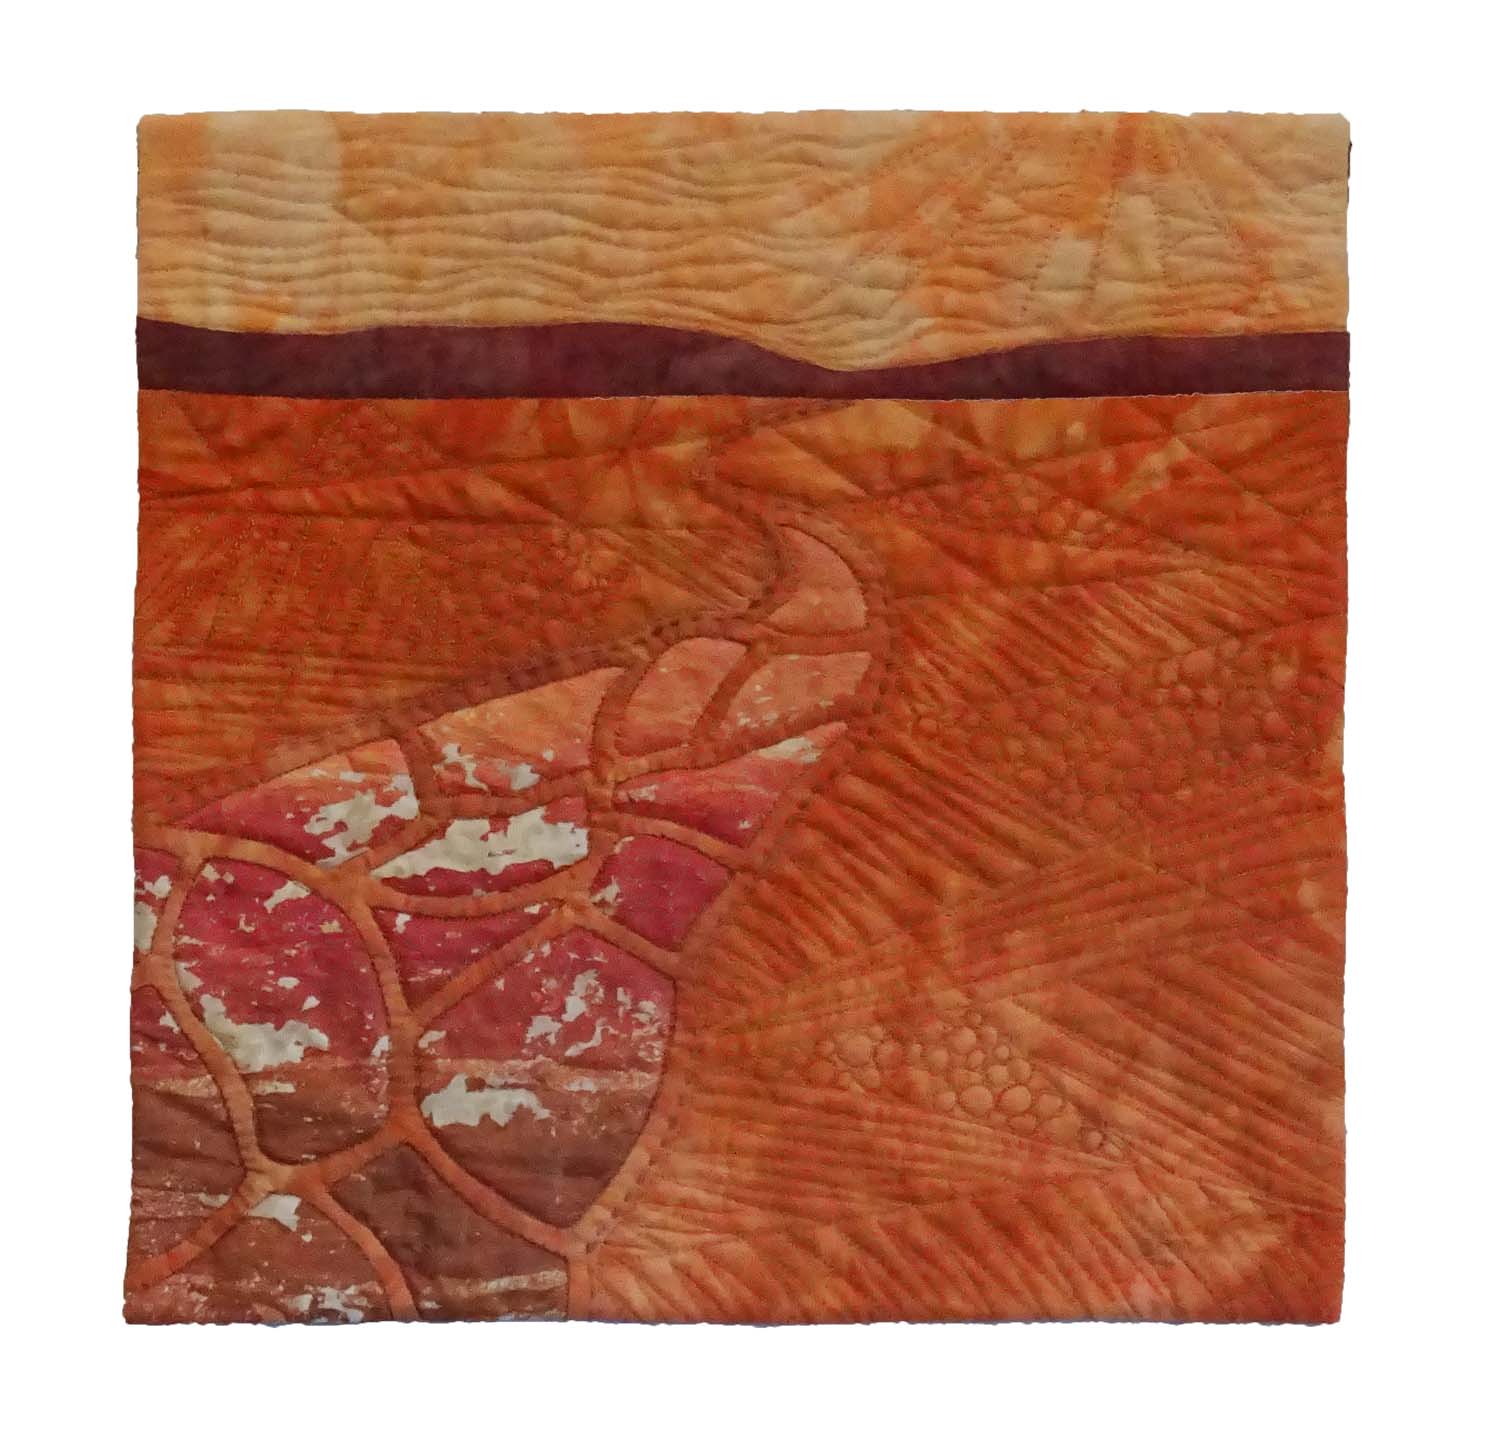
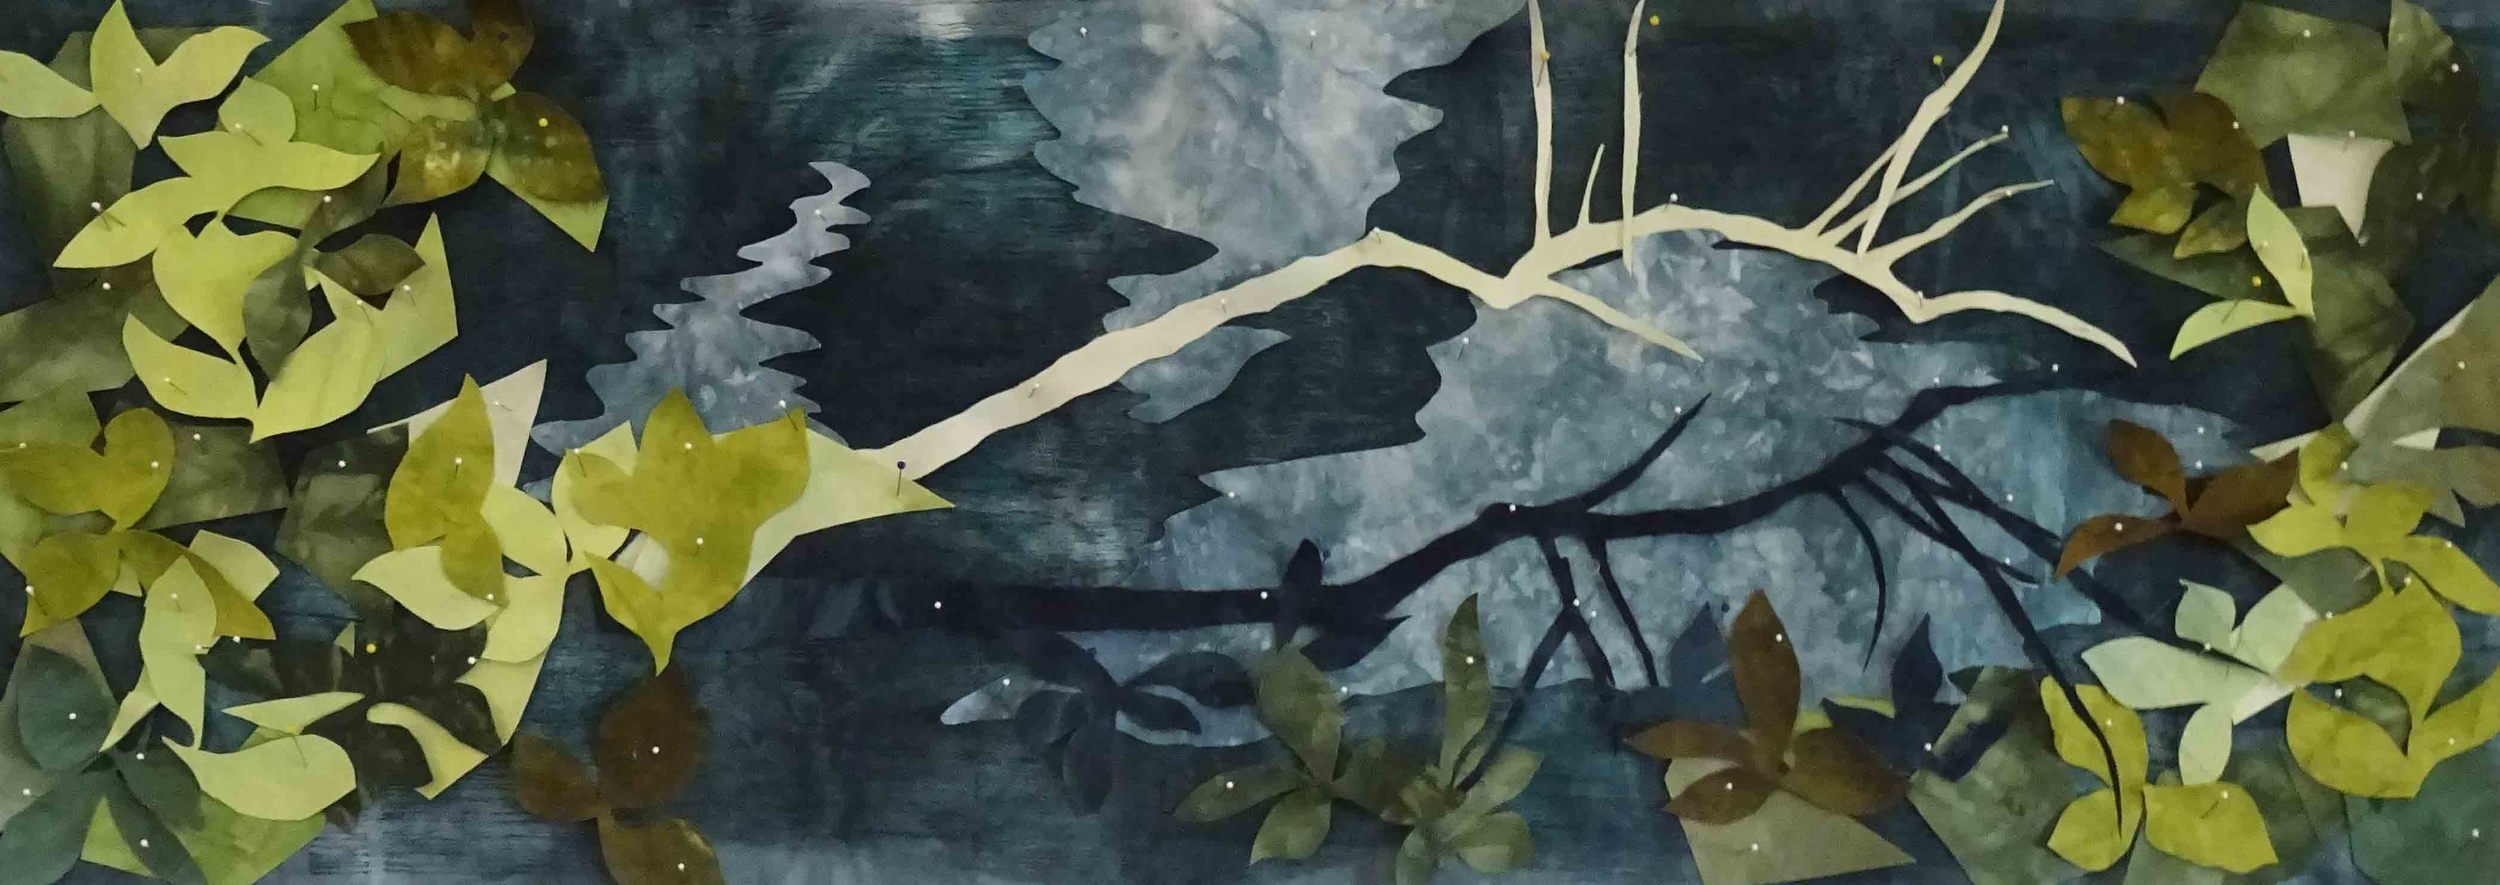
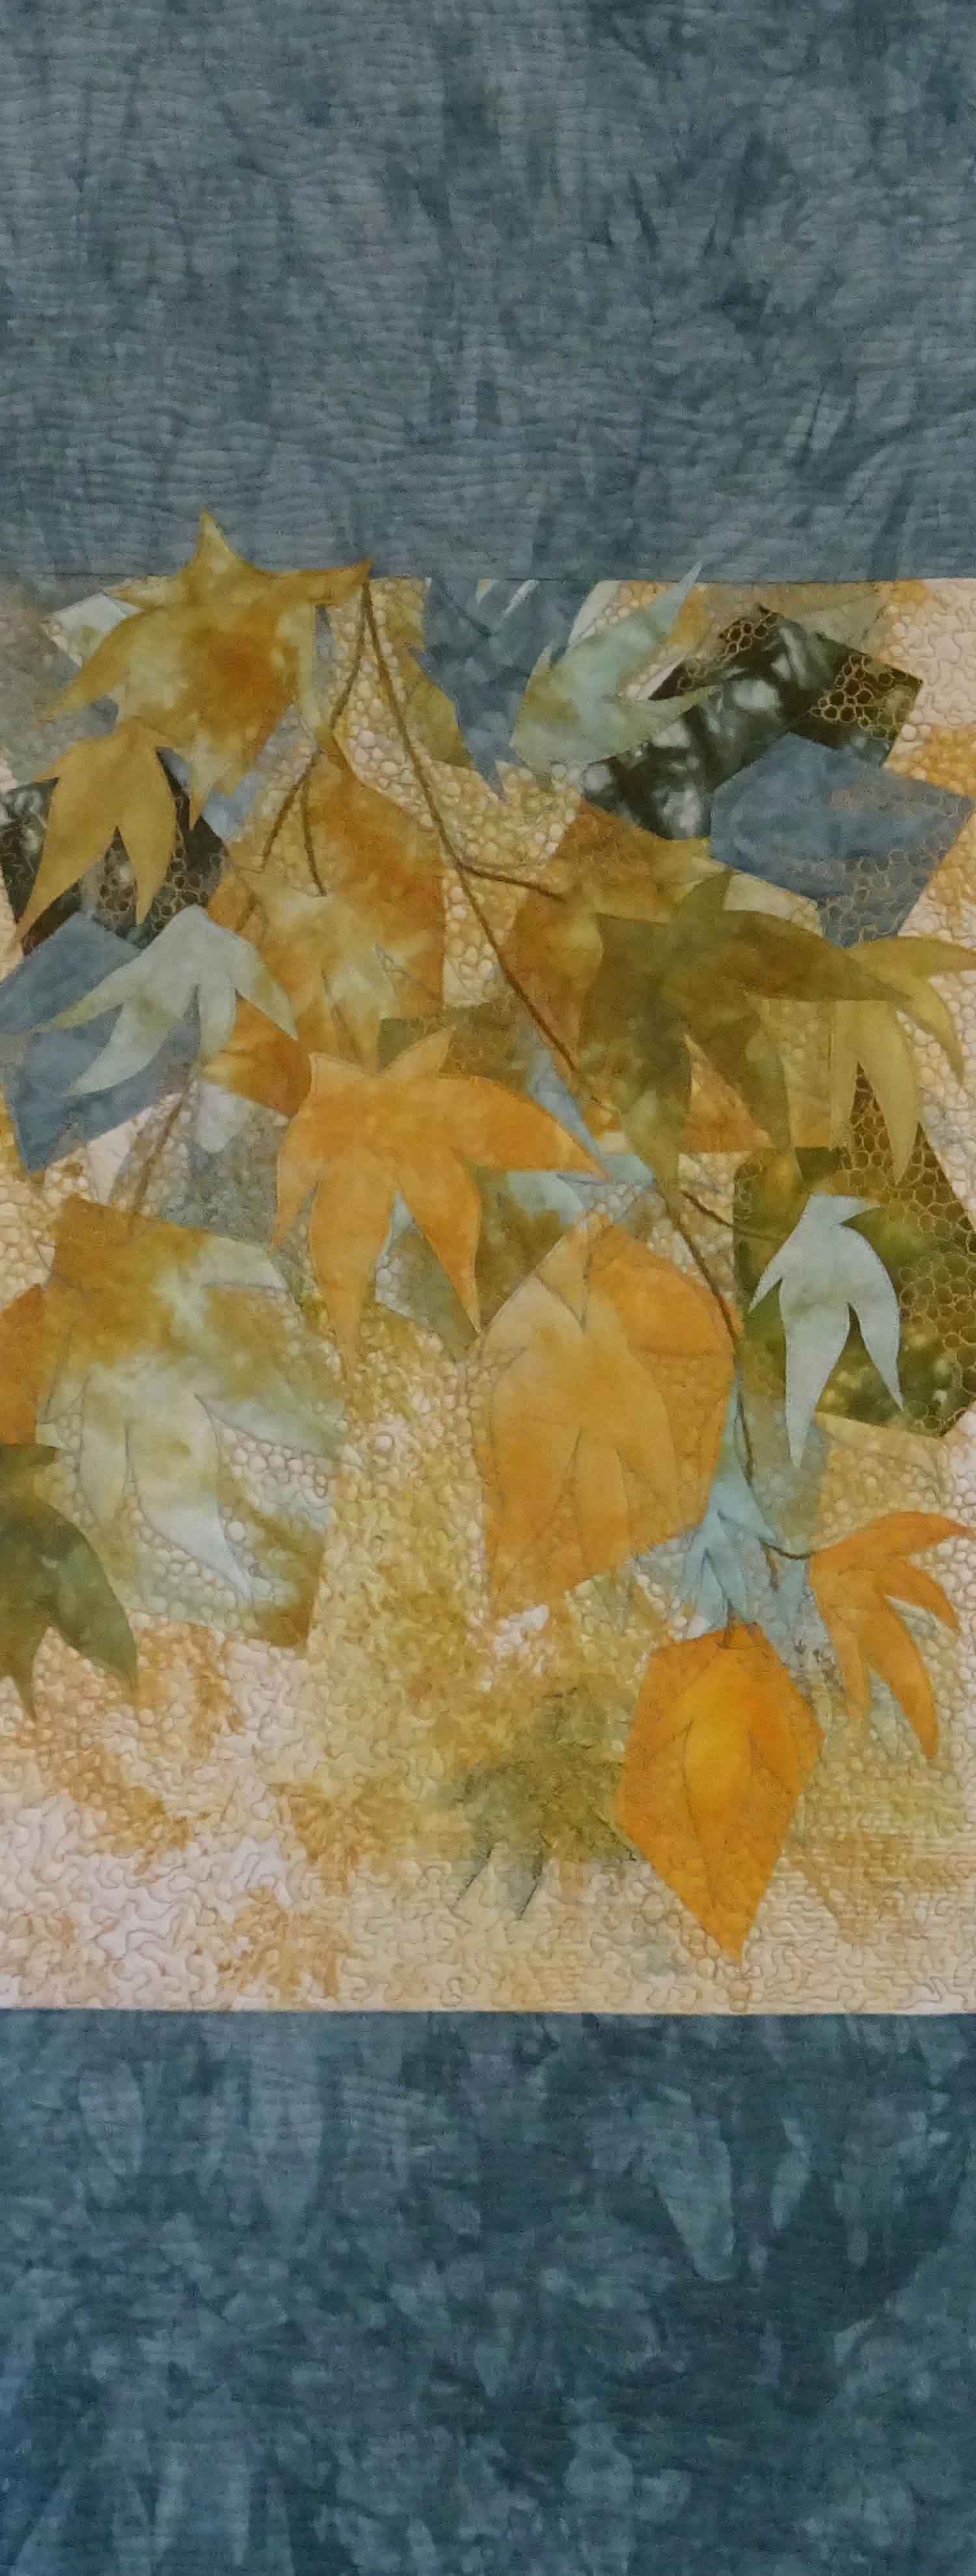
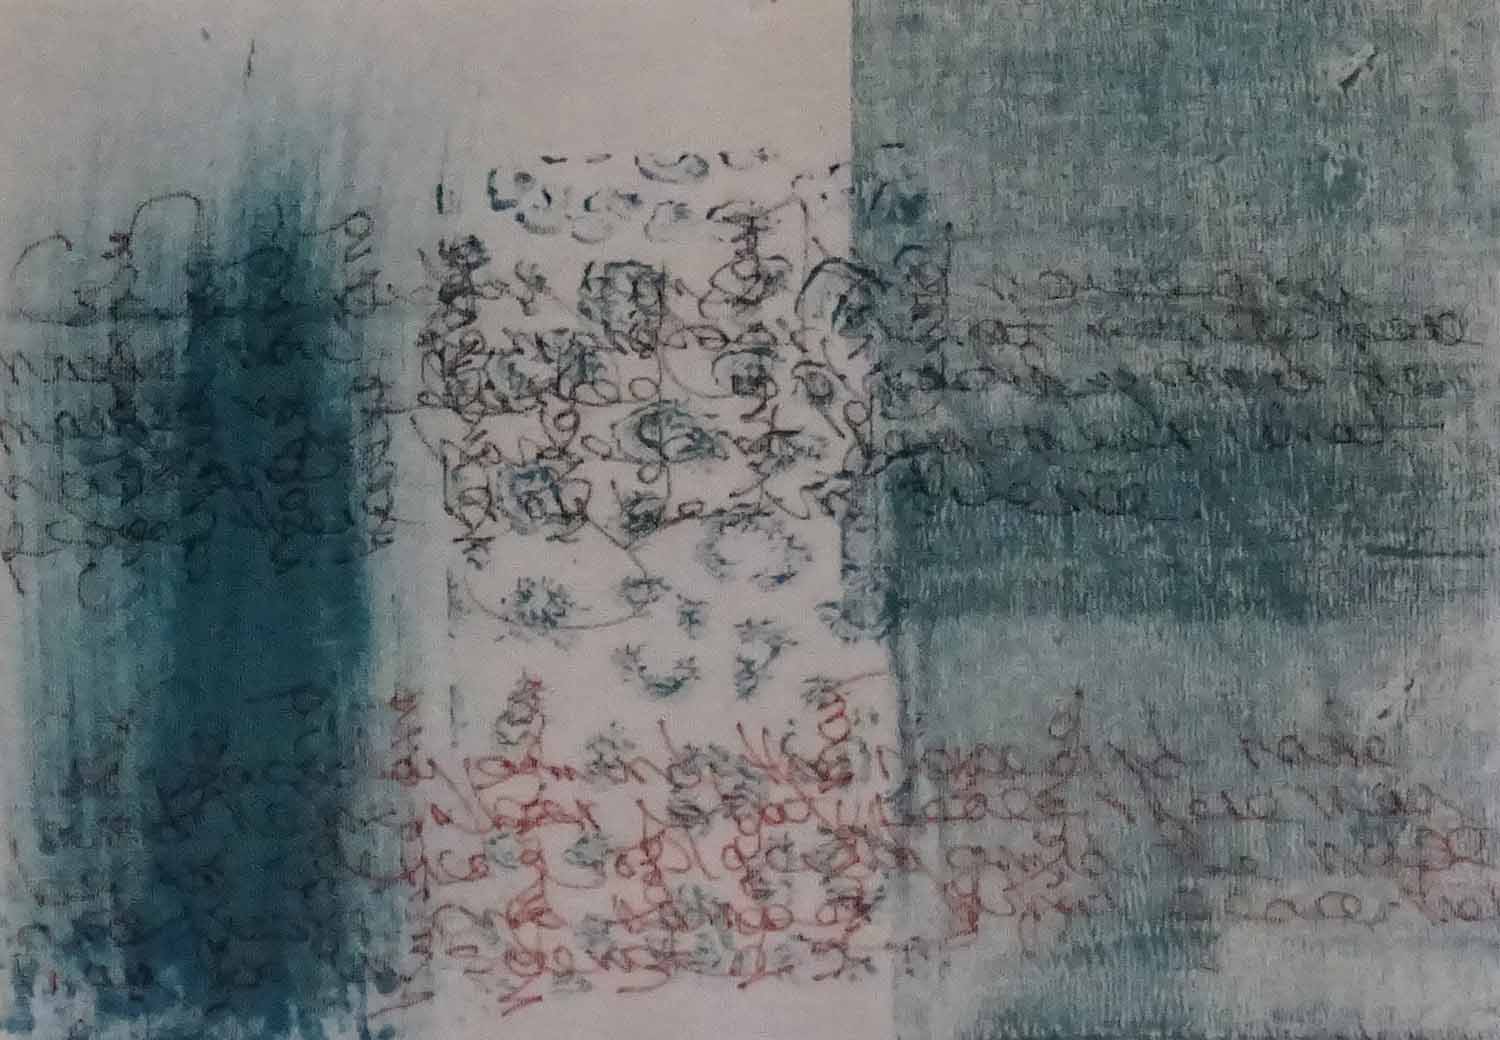
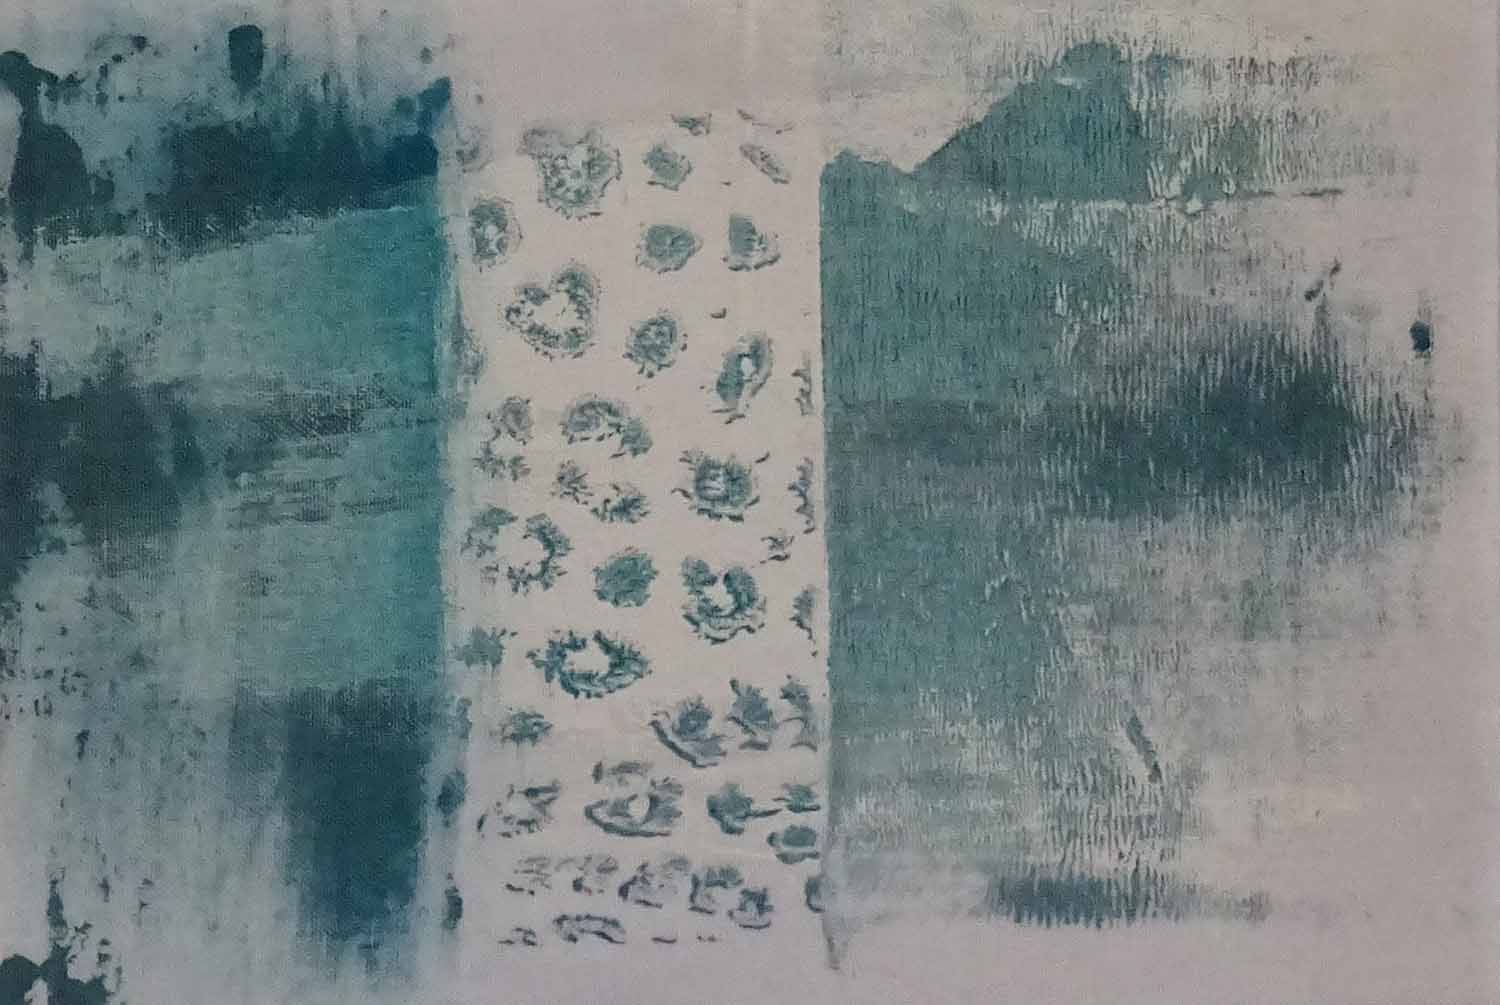
In fact I was so pleased thought I'd do a little more monoprinting .....

MonoprintGreen1.jpg

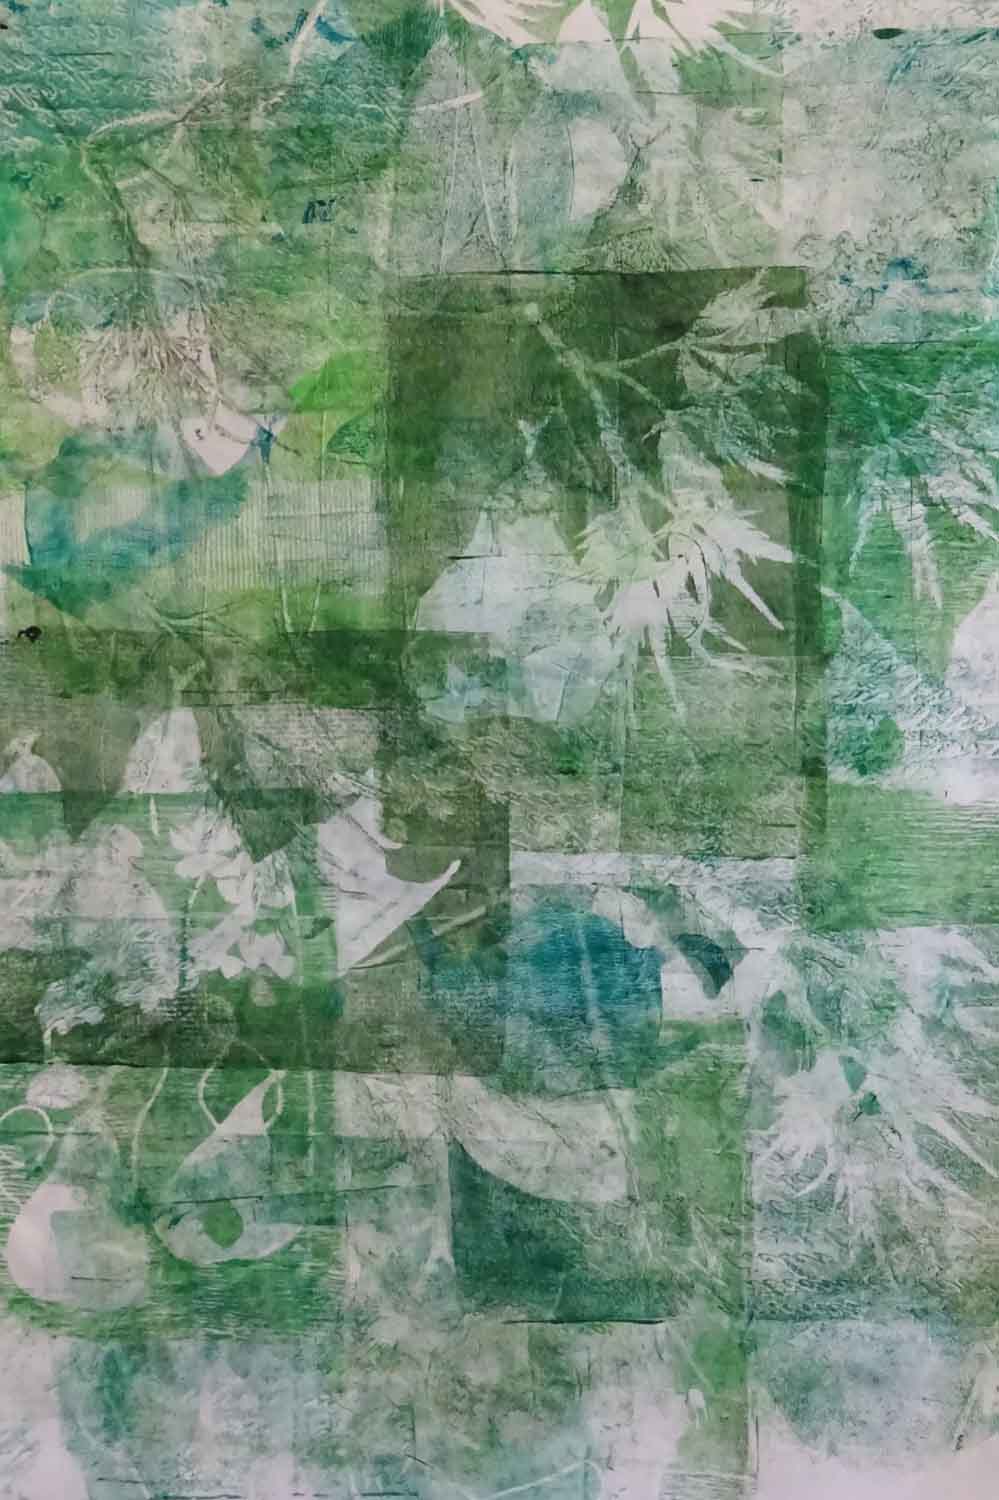
So I'm looking for green fabrics  ......

Thanks for dropping by  ....   CC

More Reverse Applique

This week I've been working on two new pieces for the Stepping Stones Series.  

I love stitching the reverse applique and with these new pieces I decided to put the horizon line behind the applique ... like a landscape within a landscape .....

Part way through the applique process,  I wondered what if I only reveal part of the landscape and left some of the stepping stones in the top fabric ... and stitched the stepping stones shapes but without revealing the landscape beneath .

Here is the finished result .....

                 Stepping Stones Series # 12  ' Open Road'  12"x12"   © CarolynCollinsArt 2016

                 Stepping Stones Series # 12  ' Open Road'  12"x12"   © CarolynCollinsArt 2016

Tried a reversal of the color combination for the second piece .......

      Stepping Stones Series #13  ' Over the Hills ....'   12" x 12"   © CarolynCollinsArt 2016

      Stepping Stones Series #13  ' Over the Hills ....'   12" x 12"   © CarolynCollinsArt 2016

I'm off to stitch this second piece ....  Thanks for dropping by   CC

New Work .... Mangroves

This week I've finished the quilting and facings for the Mangroves piece .......

Happy with the end result .... enjoyed the quilting .....

but can see refinements for the construction process ....  so on to the next mangroves piece!!  

Thanks for dropping by .....  CC

Grevillea Inspiration and Design

I love the Grevillea flowers in my garden this time of year  .... I've  been taking more  photos 

and have been comtemplating a number of different design options  ....

My first effort looked quite interesting on the design wall but turned into a disaster when it came to stitching the design ........ too many layers of fusible and fabric for my machine to handle - I used the leaf print on organza for the background and this may have contributed to the stitching problem ....

For my second effort,  I decided to rework the design and  use reverse applique to reduce the number of layers to stitch through and then add applique shapes   ... much happier with this version ....... though the design still needs some work .....

I'm going to try some new compositions for the next piece in this series ....

Thanks for dropping by    CC


Australia Wide Five & Art Studio Re-organised!!

This week  I am celebrating some achievements ...... 

Firstly, the OzQuilt Network, Australia Wide Five Exhibition opened at the Bunbury Regional Art Galleries,  64 Wittenoom St Bunbury on Friday 23 September and runs to Sunday 6 November 2016 before continuing on tour.  The gallery is open daily from 10am to 4pm and entry is free.

My piece 'Forest Pansy' is part of this Exhibition.  Click here to see all of the fabulous work that will be on tour.

Secondly .....  its done!!  After the delivery disaster earlier in the month, I took the opportunity to revisit the plans for my studio and decided to 'keep it simple'!!!  

Feels so light and spacious now and there is room for all the important things ... including a spot for my devoted poodle!!!  Now I just have to deal with the chaos in the spare room!!!

So it's back to work ....   

Thanks for dropping by .....   CC


Translation to Fabric

Its the end of Term 3 of drawing class and I've been looking over the work we did.  

Two classes stand out because they lots of fun and because I am thinking the approaches used could translate into fabric and make very interesting backgrounds

The first involved an excursion to a local creek and walking track ....

.....  here we collected natural materials from around the site .... grasses, bark, twigs, stones and seedpods ..... whatever took our attention and these were laid on our paper ... to act as natural stencils.  We sprinkled them with graphite powder and then sprayed with acrylic inks and then left them to dry before drawing the landscape using just charcoal and sanguine.

This dual connection between the found materials and the landscape produced some lovely results.  Here is my effort .. doesn't look too much like the actual landscape!!! 

The second class that offered  translation potential involved 4 panels and 4 compositions made up of shapes and inspired by  foliage of our choice .

Each panel had to work as a composition as did the combined panels.  

Dark and light tones were added and then combinations of color to provide the mid tones.

This process produced some very interesting abstract compositions that seem to have the potential to translate easily into fabric.

I  chose Magnolia leaves for the foliage and was very pleased with the composition of shapes in the 4 panels.  Here is my work so far..... although not happy with the colors however I can see potential ....

I'm keen to try some more  combinations and variations of tone and color and over the break  will experiment with these ideas and see where it leads....... 


What's in a Name? .... and the SAQA Oceania Blog Hop

This is my donation to the 2016 SAQA Benefit Auction ....

What's in a name?  

'High Road'  was made a part of a series I have been working on over the last 12 months or so, called 'Stepping Stones'.  This series was inspired by some crazy paving in my garden and uses reverse applique, a technique I really enjoy.

After sending in my auction piece I received an email from Martha Sielman  ... she liked the effect  but wanted to know why I'd called it "High Road"?

So let me show you a couple of the other  pieces in the series ..... 

 
        ' Green Hills'  Stepping Stones #4

        ' Green Hills'  Stepping Stones #4

      'Winding Way'  Stepping Stones #3

      'Winding Way'  Stepping Stones #3

For me,  this series is an opportunity to explore color combinations, design and horizon lines.   

When it came to the SAQA Benefit Auction piece I thought .....what if the top edge of the composition becomes the horizon line ... high horizon line ... "high road"  .... made perfect sense to me!! 

The process of making these pieces involves layering the 'road'  fabric beneath and then cutting away the top fabric as I applique the design. Once this step is complete, the hills/horizon line and sky are added and then lots of quilting.   In these small pieces the applique is done by hand. For lager pieces I use machine applique/reverse applique.  Most of the pieces in this series are mounted onto a painted or fabric covered stretched canvas.

More recently I have been exploring using different textures ... a painted background and using text ....

   ' Written Road'  Stepping Stones # 11

   ' Written Road'  Stepping Stones # 11

 
    'Painted Road'  Stepping Stones #10

    'Painted Road'  Stepping Stones #10

The auction will kick-off at 2pm EDT on September 16 with Diamond Day bidding - and early bird opportunity to purchase any quilt for $1000.  The 12" x 12" Auction Quilts will be divided up into three sections for bidding purposes.  Each week, a different section of quilts will be available for bidding, starting at $750 and further reduced throughout the week.

'High Road'  will be included in Section 3  which is open for bidding from 3 -9 October.

If you've missed some of the earlier participants in this Blog Hop,  I can recommend having a look.  Here is the link to the  SAQA Oceania Blog Hop

We've saved the best till last ...  don't miss Lisa Walton's posting in this Blog Hop on 14 September 2016  at  www.firbreinspirations.blogspot.com


Studio Re-organisation ...... Not!

I was planning to show you my newly re-organised studio today .... however,  when the new desk I had ordered,  to make the best use of the space I have,  was being delivered last week, it slipped, dropped and broke in two!!!  so they took it back to the depot and I have nothing to show!!  The studio is feeling very spacious!!!

Instead, let me tell you about a new piece  I am starting to work on ....

I have always been fascinated by the Grevillea that grows in my garden, and it's in full bloom right now.  So I've been taking lots of photos .....

The challenge is to capture the wonderful color and form of this flower!  I've been sketching some layouts and have an idea of how I might be able to bring it together.   Thought I would start with a small piece 10"  x 12"  to see how it works in practice!  I tried printing with the Grevillea leaves during my latest printing session so I'm hoping that will work as the background to the piece.  Will let you know how it progresses .....  

Thanks for dropping by   CC

New Art in the Stepping Stones Series

This week I've been working on a new piece in the Stepping Stones Series ....  I love this series because it allows me to play with design and color combinations.

In the last piece I included a streak of contrasting blue ......

                 © Carolyn Collins 2016 " Written Road"   Hand dyed fabric  12" x 12"  

                 © Carolyn Collins 2016 " Written Road"   Hand dyed fabric  12" x 12"  

This time I've gone a bit further and used a contrasting fabric as the background for the reverse applique.....

               © Carolyn Collins 2016  " River or Road?"   Hand dyed fabric  12" x 12"

               © Carolyn Collins 2016  " River or Road?"   Hand dyed fabric  12" x 12"

The quilting is well underway .....  it looks so different in this photo of the work in the machine, an entirely different perspective!

                        © Carolyn Collins 2016  "River or Road Detail"  

                        © Carolyn Collins 2016  "River or Road Detail"  

I'm not sure whether this is a blue road or twin rivers??  I'll think about it while I get on with the quilting!  Thanks for stopping by ....  CC

Facings, Framing and Mounting on Canvas?

This week has been all about finishing work ... think I have the facings sorted but I've found some challenges when it comes to mounting work on stretched canvas and framing work!  I decided to mount LeafLines #20 on a stretched canvas for the exhibition  at the GCS gallery in Sydney.  While I've been using stretched canvas for my Stepping Stones pieces ... LL #20 is significantly larger!  so I've had to resolve some  challenges  ....  

-  getting the paint color for the canvas right -   I want it to blend in with the work ... in the end my trusty  '3 in 1 Color Tool'  provided the key to color mixing;

- how much stitching is required to hold the work on the canvas securely?  -  I used mounting tape to hold the piece in place and then I have stitched around the edges - so we will see!! 

- how to finish the back of the canvas and cover the staples and painted edges -  I found a framing tape and have used that to finish the back.

With LL#20 sorted I turned to the monoprints I made earlier this year.  I have quilted them on a base of white felt.

 I have been searching for a way to present them ....  I tried a traditional mounting and frame  but I think these pieces will look better without a mounting or a finished edge .... so I've tried 'floating' the quilted print over a background ......  here are two of my experiments ....

The blue background is too distracting but I like the simple white on white .....


Having reached a decision about these prints  ....  I felt like I was on a roll ......


So I pulled out a number of small landscapes  5" X 8"  that  have been hanging around  and tried a similar approach .......  for this one I think the pale blue background is a plus ........

It feels good to have sorted this framing out - but  I'm still on the trail of fresh ideas for presenting my work .....

Thanks for dropping by ...............................CC

Reunions and Reconnecting with Grace

Last year I attended a school reunion (for the first time !) ...  thanks to the encouragement of a good friend from school days.  The lunch included a tour of the school.  While it was fun to catch up with some of my old school mates .....  I was very impressed by the fantastic new facilities, not the least of which is an art gallery that has been set up in one of the old boarding houses!  

The gallery is the Grace Cossington Smith Gallery at Abbotsleigh on the Pacific Highway at Wahroonga and was established in 2013 with the intention of providing an on-site educational resource for the School. Opening the gallery to the public provided the opportunity to engage with a wider community.  

This year that engagement has led to .......

I am delighted that one of my art quilts will be included in this exhibition,  not only because it is associated with my old school but also because of the connection to Grace Cossington Smith after whom the gallery is named.  Grace was  also an  "old girl", one who lived and worked for many years in the same area of Sydney where I grew up and whose work, especially during the 1950's and 1960's, is an inspiration!

 In this period " Grace Cossington Smith came to realise her aim: to express form in color - color within color, vibrant with light"  Grace Cossington Smith: A Retrospective Exhibition, National Gallery of Australia 2005.

 If you haven't come across her work it is well worth a look.  One of my favorites is 'Interior in Yellow'  1964 ...... google it! 

The 2005 Retrospective Exhibition biography by Deborah Hart concludes with the following observation .....

" It is ultimately Cossington Smith's steadfast resolve to be true to herself in her art, to experiment and evolve at her own pace, revealing a depth of feeling for the world around her, a sense of adventure and a faith in the spirit underlying all things - ' the golden thread running through time' - that makes her one of the most brilliant artists of her generation."

Something to strive for!


Mangroves on the Design Wall

A while back I posted about drawing in the mangroves and contemplated the possibilities  of translating the sketch into fabric ....  well I've been working on the idea and after playing with the possibilities for a while,  I finally have some ideas up on the design wall,   just pinned at this stage ....

It still needs lots of work, but after looking at the black and white version I think its taking shape nicely.  Looking at the value placement in the composition really helps me to see how its working and how my eye moves across the piece .... not always so easy to see in full color!

I haven't yet decided on the final format for the piece .... I'm contemplating whether to add strips to top and bottom .... although this long thin landscape format looks good in this post ...... what do you think?

New Artwork with Leaf Print


This new piece has been built around one of my recent maple leaf print pieces made with a Gelliplate .... lots of fun!!   

The print was used  as the background for the piece and the design developed by adding layers of shapes.

 I  love the patterns of light and layers created by the arrangement of maple leaves on the branches and look for ways of capturing them ....

 
                   'Golden Fall'            © CarolynCollins Art 2016

                   'Golden Fall'  

          © CarolynCollins Art 2016


This piece was inspired by a lovely golden elm, we walk past in the mornings.  It held its golden leaves well into winter ... such a lovely sight! 

After putting together the blocks of color and leaf shapes I was looking for a way to blend the layers and colors and found the answer in intense quilting with a variegated gold thread.  


        'Golden Fall'   12 " x  30"

Collage Possibilities

I often use a collage type technique to make my art works,  cutting shapes and fusing them in place,  but as I discovered this week, collage can be so much more! 

Wikipedia defines collage (from the French:  coller "to glue")  as a technique where an artwork is made from an assemblage of different forms to create a new whole.  At last weeks drawing class we made 5 quick drawings of coats, shawls and draped fabric forms,  some using ink with a calligraphy brush and one using a permanent marker, to create a set of source material.

Our task .... to tear or cut up these drawings to create a new work with a variety of tone, shape, texture and line.  Here is my effort   .....

This was a very fun project and the results so different from the subject of the source material. The process was to start by gluing down a couple of torn  pieces and then seeing what was needed without any image or specific content in mind ..... very liberating!  

Now I'm contemplating how I could  use this type of process in my textile art ... and  it seems it might offer some interesting possibilities for my recent monoprints .....


Inspired by History

After my experiments a couple of weeks ago, I decided to try using text to create the background for the next Stepping Stones piece.  My first efforts with my handwriting left a little to be desired and then I recalled some letters my mother had passed on to me, written to my Great Grandmother by her  "forbidden love"   (apparently not considered a suitable match!)  in 1865.  In those days in the colonies,  paper was in short supply and letters were written in a cross hatched form  (luckily the handwriting is very neat and they are quiet readable!! )  These letters were the inspiration for using the cross hatched format in my text background.

I used a pigma pen to write on the chosen hand dyed fabric and being in a philosophical frame of mind decided on the first couple of line of the poem 'Desiderata'  .... not that it is legible in the end!

This composition uses two merging roads and a narrow strip of contrasting fabric at the horizon.  Here's the result .......

        Stepping Stones # 11  Written Road   12" x 12"  © Carolyn Collins 2016

        Stepping Stones # 11  Written Road   12" x 12"  © Carolyn Collins 2016

Past & Present!

This piece Leaflines #20  has just returned from exhibition at the 2016 Sydney Quilt Show .... and it has a bit of history!  

The original composition was completed in February this year but there was something that made me hesitate when it came to the quilting stage ...... and after much contemplation I decided on some modifications .....  as a result I had to scramble to make the delivery deadline for the Sydney Quilt Show!!

While it's always interesting to see both versions side by side .... I am much happier with the final version!

This piece was hung on a rod for the Show ... now it is returned I plan to mount it on a stretched canvas.

Painting Fabric

I've been trying our some ideas for painted backgrounds this week as part of my plan to only use fabrics only my own fabrics .....    In each of the samples I painted Permaset Textile Ink applied with a sponge/palette knife, a stamp and a brayer .....

In the text sample I used a Pigma 05  micron pen in black and rust to write on the fabric before painting.  The Pigma pen works well without leaving any build up of ink.  Writing on hand dyed fabric works well ... in this sample I wanted to test the effect of painting over the written text.

For the gesso sample I painted white gesso with a paintbrush across areas of fabric and allowed it to dry before painting.  The gesso adds a subtle texture.

The collograph plate was made with a hot glue gun - the plate didn't work as a stamp directly onto fabric, so this time I stamped onto a Gelliplate and then printed the sample as a monoprint which produced an interesting result.

The seed stitching used Perle 8 and Perle 12 threads prior to painting. This results in a nice texture .... I have contemplated removing the stitching to see the result.

I'm going to use the handwritten text for the background in the next Stepping Stones series piece .....

A New Challenge!

Most of my art work to date has used hand dyed and painted/printed fabrics together with batik fabrics.  Recently I have been thinking that I would really like to make or create all the fabric I use in my work. This week my coach asked me what would it take?  The answer was simple ... just decide!    So I have.  There are a few pieces in the pipeline using batiks,  but from here on the challenge is to create all the fabrics I use.  

The most recent piece in the Stepping Stones series just happens meets the challenge .... the background in this piece is 'painted' ... I used painted fusible webbing to create the fabric ......

Stepping Stones # 10  Painted Road                         © CarolynCollins 2016

Stepping Stones # 10  Painted Road                         © CarolynCollins 2016

So the challenge is ahead!  I'll keep you posted.....

Drawing the Mangroves!

For last weeks drawing class we took a trip to Jervis Bay and to the board walk at the Maritime Museum.  This was a first for me ... the board walk winds it's way out through the mangroves at the edge of the bay ... its like entering another world, quiet and a little mysterious with wonderful reflections on the water and yet looking down you can see the mangrove shoots, the currents of water as the tides change and even the odd fish!  It was so easy to loose track of time sitting on the boardwalk sketching .....

The project for the day was to try and capture the feeling of the mangroves.  We started with a pale wash over gesso and then added some quick sketches of the mangroves with sgrafitto and wax followed by another wash thrown over the work ... good fun!!   This provided the background for a more drawing.  Here is my piece .... I've  started on a sketch of a mangrove branch and it's reflection in the water .... 

While there is a lot more work to do on this drawing, I am intrigued by these ideas and how I might translate them into fabric!  I'll let you know how I get on ....

Getting Ready for the Sydney Quilt Show

This week has been all about getting my entry ready for the Sydney Quilt Show, which is just a couple of weeks away (June 22-26).  I put the original composition together in the early part of the year as part of my Leaf Line Series  and submitted my entry form in March  ....  all good.  Then I had an "inspiration"  and reworked a couple of areas !!!  I'm pleased with the end result but found it was quite a stressful process with the deadline looming !!!   Now it's all quilted and facings etc done .....

 Here are some close up shots .....

Just the hanging sleeve to stitch in place.....  I've often struggled to get hanging sleeves to sit nicely with the right amount of fullness for the rod, but this time I actually ready the instructions provided by Quilt NSW and the end result is perfect and so simple and straight forward!

 I've added my version to the Resources page above if you need to know how....